Navigate / search

Painting 101: Bring Your Own Beer

I woke up this morning to more of this.

And some of this.

And a bit of this.

It’s less than inspiring, I can assure you.

Though it is kind of fun watching the confused looks on my dogs’ faces as they slip and slide across the yard.

When I assess the gray skies, icy roads, and pine tree boughs drooping under the weight of ice and snow, I come to 2 conclusions:

1)  Global climate change is not a myth, and

2)  I’m not leaving the house.  Ever.  Again.  (Unless someone wants to buy me a pair of snow pants, long johns, mittens, a scarf, and a hat.  I’ve somehow managed to purge these items from my wardrobe since my days of living in Minnesota, which is a bummer because I think the only fun thing to do in this weather is find a proper hill and go sledding, but that’s only if you own snow pants and have access to a warm mug of hot chocolate when you get home.  And I just so happen to have a little something called Snickerdoodle hot chocolate.  And if you ever visit me, I might just share some with you.)

It’s days like these when I wish I’d thought ahead about other home projects that we’ll need to finish before we can ever hope to sell this place.  Like painting.

It was just before I left for Miami when I promised you a post about painting.  That was sometime back in 2010.  (Does that sound weird to anyone else?  2010 still sounds like The Future, doesn’t it?)

Anyway.  Do any of you even care about painting?

Is it one of those mundane DIY home projects that seems pretty self-explanatory and this is a complete waste of my time?

Well, it might be because I have this insane habit of complicating things and a fear of making concrete decisions, but in my experience, painting a room always turns more laborious and time-consuming than I originally presume.  But I have improved significantly over the past few years, and now I can knock out an average size room by myself during a long afternoon.

First, the tools.  To paint a room in your home, you will need:

  • Paint – Have an idea of the room dimensions when you go to the paint store.  The clerk will be able to tell you how many gallons you need to cover around 2 coats of paint.  I honestly don’t really have a preference when it comes to brand, but keep in mind that almost any paint color can be matched to almost any paint brand.  You will also need to pick a color and sheen.  The shinier the sheen (i.e. gloss, semi-gloss, satin, eggshell, etc.), the more imperfections in your wall tend to show through.  That’s why I’ve learned to pick “flat” as my sheen for the walls.  I think I picked eggshell for the kitchen, simply because glossier sheens do tend to wipe down easier.
  • Primer – If you’re painting over a bold existing wall color, you’ll want to start with a coat (or 2) of primer.  Paint experts will probably recommend that you use it regardless.  We always use it on our ceilings after we remove popcorn, because the bare drywall soaks it up like a sponge.  And we’d rather the drywall soak up inexpensive primer than paint.  Nowadays you can actually get paint that’s mixed with primer, but I have yet to try one of those products.
  • Paint Key & Stir Sticks – Seems obvious, but you’ll be surprised at how often people forget these two items.  The paint key is a little metal tool used to open the paint can (also works well as a bottle opener), and the stir sticks are those wooden sticks used to stir the paint if, like me, you buy the paint with the intention of using it right away but instead let it sit in your laundry room for weeks before you build up the energy to actually clear out and paint a room.  Most paint supply stores will provide these items at no charge.
  • Roller & Tray – Pick a decent roller handle and a package of nice-quality rolls.  I don’t use the foam rolls, and I pick something that says it’s made for smooth surfaces.  Because… you know… my walls are smooth.  And I hate cleaning paint trays.  So.  Even though it is arguably the less eco-friendly option, I buy the thin, disposable tray liners that sit inside a regular paint tray.  Just think of how much water I’m saving by not spending an hour trying to wash out a tray!
  • Paint Brush/Edger – This is for painting around your trim.  I’ve used one of those flat edgers before, which tends to work pretty well.  However, it’s annoying if you get too much paint on it (which happens to me a lot), so nowadays I prefer this perfect little short-handled brush to paint around the trim.

Paint edger

Short-handled paint brush.  This is the Wooster “Shortcut” brush, and I picked it up on a whim at the Home Depot paint counter.  This baby handled like a PRO.  I could easily cut-in around the trim without getting any paint ON the trim itself.  The best part?  I saved a ton of time and money from not having to use painter’s tape.

  • Painter’s Tape (optional) – With the use of a brush like the one above, I strongly urge you to try painting around the room without using tape.  However, if you still feel the need, splurge on something called Frog Tape over the typical blue tape.  I found that frog tape peels off much more cleanly with a lot less paint seepage.

Tip:  Remove the tape before the paint completely dries – it’s less likely you’ll peel your paint off with the tape.

  • Drop Cloth (optional) – You can easily avoid drippage by not overloading your paint roller, but if you want to be on the safe side, invest in a drop cloth to protect  your floors.
  • Helpers (optional) – These can make or break a project.  You decide whether it’s worth the risk.

So here’s what you need to do to have a perfectly painted room:

1.  Clear out the room.  If some furniture is large, you can just push it towards the middle.  But the emptier the room, the easier it is to paint.  Also be sure to remove your light switch and outlet cover plates.  It’s very simple to do with a screwdriver, and your finished room will look much cleaner by painting under the switch plates rather than over them.

2.  Fill-in any holes in the wall with mud and a putty knife.  No, not mud from your backyard.  I love, love love this DAP Fast ‘N Final Lightweight Spackling putty.  It’s the consistency of cool whip or a light frosting, and is SO easy to apply.  It goes on incredibly smooth and you can paint right over without even sanding!  It’s perfect for me, since I’m terrible at planning ahead.  (Although the reviewers on Amazon beg to differ.  Maybe I’m just a spackling pro?)

3.  Open up your paint, give it a good stir, and use your short-handle brush or edger to start painting around the trim.  I fill a small container with paint so I can easily carry it around the room with me rather than continuously running back over to the gallon bucket to fill my brush.  You’ll want to paint smoothly around every window and doorway, and also along the ceiling (or crown molding) and baseboards, and even down the inside corners of the room and around all of the light switches and outlets.  Also get any narrow spaces (like between a doorway and a wall) that are too narrow for the roller.  Basically, you’re outlining the entire room where it will be difficult for the roller to reach.

Yes, it’s tedious.  No, it’s not fun.  But get some good music crankin’, put on your big boy/girl panties, and muscle up.

THEN, do it again.  That’s right – you’re going to want to do 2 coats of this trim paint to ensure even coverage.  Don’t worry, though – the second coat goes much more quickly than the first.  You probably won’t need to worry about drying time.  By the time you finish the first coat, the place where you started will likely be dry enough to start round 2.

You can see in the above photo that I opted out of using primer this time.  The color I chose was darker than the other sample colors on the wall, and the walls were already fairly smooth.  Plus, I was just plain lazy. But the Glidden interior paint (my first time using this brand) seems to be holding up pretty well!  You can also see our ceilings were not-yet painted.  Normally I would recommend painting the ceilings before the walls, but I am not the ceiling painter of the house and was tired of waiting, so I went ahead with the walls first.

4.  Now that you’ve completed all of your tedious tracing, it’s time to color it in!  Fill the deep part of your paint tray with the paint, load up your roller (but not too much – you don’t want massive paint drippage), and start applying it to the walls.  I think it’s debatable about whether you should paint in a “W” pattern or straight up and down – in the end, you just want to make sure you get a nice, even look without any streaks or drips.  I use the “W” method.

And again, you’re going to do 2 coats.  If you took your time painting around the trim, this part should be a breeze.  And the paint might look uneven as you roll it on, but pay attention as it dries – it should even out and you shouldn’t see any streaks when it’s completely dry.

Now is not the time to quit.  You will get a decent shoulder workout.  This may be the time you decide to crack open a motivational beer.  When I feel like I want to quit because I’m covered in sweat and paint and my hands feel like they might snap off at the wrist, I know in my heart that it’s time for a beer.

In the end, it’s completely worth it.  There’s a huge sense of satisfaction that comes from transforming sterile, hospital-like white walls into something warm that can highlight trim work, photography, art, or just makes you feel more at home.
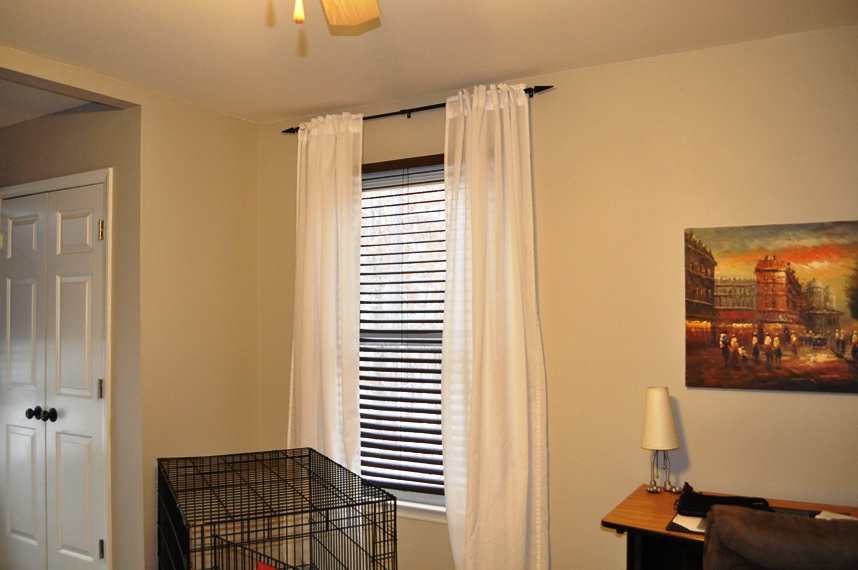
But I will stand by my original assessment that HGTV is full of CRAP, and this is not something you would want to do over and over again if you don’t like the color.  Choose wisely, my friends.

5.  Clean, clean, clean!  When you’re finished painting, you will be so tempted to just drop everything in the middle of the floor and call it a day.  But cleanup isn’t so bad if you used a drop cloth and a disposable paint tray.  The most important step is cleaning your paint brush.  Run it under warm water while gently pressing and flattening the bristles on the bottom of the sink.  Keep going until the water runs clear.  THEN, give the brush some good whacks on the edge of the counter or on a paper towel.  This will fluff the bristles back up and get your brush ready to use for the next go ’round.

Sooo… remember to fluff your brush by whacking it to get it ready for use.  (Man, why can’t I seem to avoid porn references in this blog??  It’s like I don’t even have to try.)

Snow Day

I was actually going to go apply for jobs today.  I was.

Not the you-better-make-sure-your-resume-is-perfectly-polished-and-printed-on-special-paper-so-it-stands-out-from-the-masses type of job, but the fill-out-a-generic-application-and-if-you-remember-how-to-spell-your-name-and-show-up-to-the-interview-wearing-something-other-than-jeans-you’re-hired type of job.

The plan was to just drive around until I saw something… inspiring.

But then I looked out the window and I saw this:

So I decided to sit in front of the fire and eat leftover quiche instead.

HEY.  Do not judge me.  Motivation is hard to come by these days, and until I buy myself a set of scrubs and refuse to change out of them even when I leave the house and forget how to put on makeup and lose my hairbrush and stop wearing bras, I’m not worried.

Bustin’ Out the Chops

In case you haven’t noticed, I’ve been avoiding the use of photos in my posts for quite a while now.  The reasons are painful and twofold:

1.  My favorite lens is still busted.  I don’t feel justified in sending it in to have it fixed until I have an actual job.

2.  Since my computer broke when I went to Miami, I haven’t yet reloaded Photoshop onto it.  My kitchen tends to be pretty dark when I cook (and has a weird mixture of recessed and under-cabinet lighting, which makes the photos look a little strange.  I like to use Photoshop to fix the color.

But today?  Screw it.  I need some pictures in my life.  It’s been far too long.  So PLEASE ignore the strange colors.

I managed to find some photos of a recipe I made awhile back when we had guests from out-of-town.  I’m sure they thought I was a complete nut, cooking away in the kitchen and pausing every few minutes to take a picture.  Because, you know – I’m that good.

I tend to freak out a little when I have to make something for other people.  Why?  Because I have this annoying habit of screwing up in the kitchen.  A LOT.  But I’m usually good about laughing at myself when that happens, and Justin will eat just about anything.  It’s a little different, however, when you have other people – other hungry people – depending on you for their sustenance as well.

So I made my “fall-back” company recipe that always goes over well if I have non-vegetarian guests.  It’s actually my mom’s recipe, and I love how old-school it is.

Baby, it’s PORK CHOP TIME!

First, you’ll need a big ol’ one of these:

(Like I said before, please ignore the odd color of these photos.  It’s the crazy lighting in my kitchen and lack of Photoshop.)

Wow.  Is anyone getting turned on?

No?  It’s just me?

Ahem.

This is a pork loin.  So technically I made pork loin, not pork chops – but this recipe works just as well with about 4 chops.

And actually, I’m not positive if this is one loin split lengthwise into 2, or if this is 2 skinny loins.  Hey, I just buy the meat and cook it.  I don’t claim to be an expert.

So you see how it’s split lengthwise down the middle?  Just chop each of these strips up into little pork medallions.  They end up all small and adorable, and they cook much quicker this way than larger pork chops.

Pork Loin Medallions

Here’s what else you need:

  • 2 c. (about 3 slices) of bread, ripped into small cubes
  • 2 Tbsp. chopped onion (or the equivalent of dry minced onion)
  • 1/4 tsp. poultry seasoning
  • 2 Tbsp. water
  • 2 Tbsp. melted butter
  • 1/3 c. Marsala wine (this is usually found in the grocery aisle with all of the cooking wines/vinegars)
  • 1 (10 3/4 oz.) can of cream of mushroom soup

1.  Go ahead and get your oven preheated to 350-degrees F.

2.  Put some type of large skillet on the stove over medium-high heat, and grease it with a piece of fat from your pork.

3.  When the skillet is good and sizzlin’, brown the medallions for a couple a minutes on each side.  (Do this in batches if you can’t fit them all at once.)  Once they’re browned, place them in a single layer in a shallow casserole dish.

*I actually should’ve had my skillet a bit hotter – you want the meat to be more brown than gray, and it should sear fairly quickly.  You don’t want these to cook through on the stove because  you’ll be baking them in the oven.

4.  In a small bowl, combine the 2 cups of soft bread cubes, 2 tablespoons of onion, 1/4 teaspoon of poultry seasoning, 2 tablespoons of water, and 2 tablespoons of melted butter.  Smush this stuffing-like substance together with your fingers, and press it firmly onto the tops of the pork medallions.

5.  Combine the 1/3 cup of Marsala wine with the can of cream of mushroom soup, and spoon the mixture over each of the medallions.

6.  Then just pop ’em in the oven for 30 minutes to an hour.  I know – what a pain that I can’t give you an exact cooking time!  But it really depends entirely on the thickness of your meat and the heat of your oven.  I have a meat thermometer and cooked them until the thermometer said they were hot enough.

I actually thought I over cooked them because the temperature was quite a bit higher when I checked after about 40 minutes, but the beauty of these little loins is that they stayed nice and tender.  They turned a pretty, golden-brown and still tasted delicious.

Though they weren’t quite this golden.  Again, Photoshop, how I miss you.

Now, because I’m a complete dope and self-admitted domestiphobe, I totally forgot about sides until the last-minute.  Luckily I found a couple of recipes that were really easy to put together.

I served it with lemon pepper green beans and mushrooms with a soy sauce glaze.

Let me just say – I could eat these mushrooms every day for the rest of my life and not get sick of them.  Oh, and they’re sooo easy to make.  This whole dinner was crazy-easy to make.  And judging from the fact that we didn’t have any leftovers, I’m thinking it was a hit.


Just the Tip

If you were hoping this post was going to be about something other than the fear of needles, you might want to check a different site.  One that charges by the month.

Today I got to experience the feeling of fluid leaving my body through a needle in one arm and fluid entering my body through a needle in the other arm.  But not at the same time.  And not for related issues.  And not really for “issues,” since both were completely voluntary.

So no worries.

But the whole thing made me incredibly grateful I’m not one of those people who’s terrified of needles.  I’m terrified of Sponge Bob Square Pants and those tubes of biscuits that pop open when you tear off the wrapper, but not needles.  I actually had this discussion with a friend of mine not too long ago.  Throughout her childhood, she faced inexplicable dread any time she had to go to the doctor to receive a shot or draw blood.  And, much to her dismay, it hasn’t gotten any better as an adult.

Now – this isn’t just your run-of-the-mill, “I-can’t-stand-to-watch-when-the-little-silver-cylinder-pierces-my-epidermis” situation.  This is bone-chilling, sweat-inducing, faint-worthy fear. The kind where she needs to warn the staff before-hand in case there’s an “incident.”

I’ll be honest – I didn’t fully believe my friend when she explained this challenge.  I mean, as far as I’m aware, death (or even severe injury) by needle isn’t exactly a common occurrence.  I thought maybe she was just being a bit of a baby.

Until I witnessed this fear today with my own eyes.

A very pregnant twenty-something sat in the chair next to mine as I was getting my blood drawn.  My attendant was filling the 2nd or 3rd little container with my blood, and I watched lazily as the dark red liquid ran up the plastic tube and entered the vial.

And then I felt it.  Sheer panic.  Not my own, but that of the girl next to me.  She was squirming around and a look of terror entered her eyes when the nurse brought out the rubber blue strappy thingie while using a calm voice to explain, “Ssshhh, it’s just a tourniquet.  Just a tourniquet.”

I mean, this girl was not playing.  You can’t fake that kind of fear.  I felt awful for her.  It was clear she couldn’t help it.  If there’s one thing to say about fear, it’s that it can’t be rationed with.  They had to gently hold her down while they drew just one small vial of blood.  She was done before me.  She hoisted her ginormous belly on shaky legs, took one look at me, and said, “I don’t know how you can do that.”

So I said the one thing I could think of to try to make her smile.

I lifted my non-needle-pierced arm, pointed to the giant protrusion that was her stomach, and said, “I don’t know how you can do that.”

As far as I can figure, we’re all built to withstand different kinds of discomfort.  We learn our limits of what we can endure and the reasons for which we’d stand to endure them.  To me, the prick of a needle is like plucking your eyebrows – slightly uncomfortable, but nothing to get worked up about.  But to others, it’s like Sponge Bob Square Pants running after them with an unopened tube of refrigerated biscuit dough.  Nothing good can come of it.

Do any of you have a strange phobia?  Feel free to share – it’s not like I can judge!

Reunited, and it Feels So… Unnecessary.

*Okay, since my post about my mom’s so-called “holiday” letter has stirred up some grumblings, I just – real quick – want to be clear: My mom has assured me that she did not intend the email to be a family holiday letter, but rather an update to friends and family about what had happened in their lives over the past year.  Since I didn’t visit, it’s only natural I wasn’t in the letter.  And I assured her, in turn, that I hadn’t intended my post to be a public slamming about her letter.  The post was about ME and how MY resolution was inspired by her letter.  Capiche?

Now back to your regularly scheduled post.

Oh. My. God.

Today I got THE notice.

You know which one I’m talking about.

And if you don’t know which one I’m talking about, you are still a young person and it’s possible that I hate you.

Not really.

But I could.

The notice I received was that a girl with whom I attended high school (HEY Ashley!) added me to the Class of 2001 Ten Year Reunion Group on Facebook.

Shit.

You know, it figures.  Just when I realize I need to start getting things figured out, they pull this on me.  It’s like, hey, why don’t you throw yourself into a room full of people who graduated at the same time as you and count how many are more successful than you – you know, the ones who actually have viable careers… children… Medals of frickin’ Honor.  Whatever.

Like it’s a bad thing I’m still trying to figure out what I want to be when I grow up.

I mean, as far as I’m concerned, it’s my high school’s fault that I haven’t decided yet.  You spent all that time teaching and preparing and counseling, but where’s the follow-up?  Ten years after I graduated?  Is a company going to invest time and money into training a new employee and then check back ten years later to see how he’s doing?  I think not.

The reunion is in Omaha in the middle of the summer, so there’s basically no chance that I’m attending.  I have too many other places to see to bother with Omaha more than once every couple of years.  Although, the one redeeming benefit I could see in going is to show off the fact that my boobies finally grew in (quite nicely, I might add) when I was 18.  Although I doubt anyone would recognize me anyway without my glasses and braces.

Bummer.

Truth is, I actually had a pretty fantastic graduating class.  From what I remember.  It’s just that I didn’t spend much time with them during my senior year.  I was too busy hanging with the Best Buy crew (where I worked 25-30 hours per week).  There were over 500 people in my class, so obviously I didn’t know all of them, but most of the ones I did associate with during school hours were pretty great people.  And from what I can see on Facebook, many of them still are.

Interesting note:  I met the guy who sat next to me during graduation for the first time at graduation rehearsal.  It’s too bad – he seemed pretty nice.

Anyway.  Do people still go to reunions anymore?  It seems like with the invention of Facebook, I can happily sit in the comfort of my own home and quietly creep on my former classmates without actually having to talk to them.  And anyone who wants to talk to me can just chat me up or drop in for a visit.  I’m open like that.

True, Facebook stalking only allows me to see what my former classmates want me to see, but do I really want to see anything they don’t want me to see?  Probably not.

I’m content in my ignorance.


It’s Been 100 Years Since My Last Confession

Okay, I’m sorry to admit that my last post caused a bit of an unintentional family scuffle, so Quick! I need to write something to distract injured parties from that which caused them emotional harm and ensure them that I am, in fact, off my gourd and frequently stream-of-conscience write about exactly what’s on my mind at any given moment with little regard to how it’s going to make other people feel.  I realize this isn’t exactly an attractive quality in a human being, but the concession is that it is often an attractive quality in a writer because it pushes me to say things that the rest of you might only be thinking but would never admit yourselves because why should you have to deal with the consequences when I’m obviously more than ready and willing to do it for you?

Like… I’m one of the many people who says she can’t stand her friends’ lengthy Facebook status updates revealing, in detail, their course of mundane moves throughout the day and whether or not their mucus plugs are still intact, but the truth is that I still don’t block them because I secretly enjoy the (completely unwarranted) superior feeling I get when I read them because, you know, I have so many better things to do with my time.  Like blogging.  Right?

And… I don’t care what anyone says – fedoras should totally make a comeback.  There is nothing sexier than a fedora.  Except maybe a newsboy cap.

And sometimes I want to turn off my phone and hurl it across the room.  Actually, I have thrown my phone across the room.  Like a frickin’ 2-year-old.  Sometimes I don’t want to be reached.  Is that such a terrible thing?  And I hate texting.  Doesn’t anyone actually talk to people anymore??

Now I feel like I owe you something for all of this truthfulness that makes me look like a crappy person (because I have a feeling this isn’t going to be one of those “movie moments” where first one person stands up and starts empathetically clapping in support and soon he’s joined by the rest of the audience because it’s finally okay to admit how we really feel and stand together without fear of admonishment and disapproval).

Because I know I’m not better than anyone.  But just like everyone else, I sometimes feel like I am.  But then Karma steps in and bitch slaps me back down.  It’s the perfect system.

So about a week ago in Omaha, we were hanging out at a bar with some friends.  I was a couple of Amber Bocks into the evening, when I did something that probably every single one of you has done at some point in your life (or maybe I’d just like to think that so I feel a little less awkward about it).  But if you have done this before, you also likely did it before the age of 12.  I am 28.

I announced that I needed to use the facilities, and with an air of confidence that comes from 7 years of public legal drinking, walked across the room – maneuvering around waitresses and busboys like it was my job – pushed open the door with a zeal that announced I had arrived at my destination and there better not be a line because dammit I have to pee, walked in, and found myself staring, much to my initial confusion, directly at a urinal.

Why is there a urinal in the women’s room?

That was my first thought.  Really.

And why is there a boy standing at the urinal in the women’s room?

Second thought.  No joke.

It was about that time when my brain stopped sloshing around in its pool of Michelob and caught up with my surroundings.

Urinal guy hasn’t turned around yet.  It’s not too late to escape unnoticed.

I took a step back, and the high heel of my boot made a very audible clack! on the tile floor.  Why weren’t my boots this loud when I walked in??!

At that point I turned and ran out of the door, quickly slipping into the safety and comfort of the other door, which was unmistakably marked with the skirted stick figure (aka. the universal symbol for a women’s rest room) and quietly prayed that no one had witnessed my humiliation.  When I finally emerged, I found myself wondering if urinal boy was somewhere in the room, sitting at a table with a bunch of his friends, just waiting for me to come out of the restroom so they could laugh their asses off.  We hadn’t actually made eye-contact, so there was a good chance he wouldn’t recognize me.  Right?

I guess I’ll never know, but the good thing is no one ever confronted me about it.  So I had another drink and got over it.  And now I’m telling you about it.

Why?

Because we’re all human.  We all do stupid things sometimes.  And I’m a firm believer that it’s how we handle these things – whether we own up to them and admit our flaws (either inwardly or outwardly) and work on fixing them, or if we try to hide them and pretend they don’t exist – that affects the type of people we become and reflects the way others see us.

And I know that I’d rather be flawed than fake.