Navigate / search

Here’s the Beef

You want to know where the beef is?

Well, here it is.

I have it.

With you.

Yep, you heard me.

I have a beef with some of you.

Want to know what it is?

I’ll tell you anyway.

Too many of you now, after I share a delicious recipe post, have left comments about them here or on Facebook.  And while many of the comments are thoughtful and nice, others are not.  Not nice at all.

Comments like, “Wow, that looks amazing! I know I could never make something like that myself, but wow!”

or

“Hey, that looks like another delicious recipe. I’d love to try it, but I’d never make it for just myself.”

What?  You think those comments sound nice?  Well they’re not.  Because think about it:  Saying you can’t do something a Domestiphobe can do, is like admitting you weren’t potty trained until you were eight.

Yep.

Those comments are mean to the people who wrote them.

And my beef is, whenever you deny yourself a pleasure simply because you think it’s too difficult to do or because it’s not worth the effort if no one else is around to enjoy it, you are doing YOURSELF a disservice.

And I have a beef with that.  I can’t help it.

First, basic cooking is not difficult.

I didn’t learn this fact until I was 25-years-old.  Until then, I’d thought of cooking as this mysterious kitcheny task with which only certain people were burdened gifted, and that I was a soul relegated to takeout, convenience foods, and depending on my husband’s sporadic cooking spells for sustenance.  (Justin enjoys cooking, too.  Just not with vegetables.  Ever.)

Knowing that I was a quarter-of-a-century old and thereby not getting any younger, a diet based on meat, potatoes, boxed meals and restaurant food was not the best thing I could do for my body.  Or our budget.

So I started looking up recipes.  And following blogs with step-by-step cooking photos.  And looking up things I didn’t know on Youtube, like “how to blanch asparagus” and “how to dice an onion.”

I had to look up everything.

But, once I saw someone else do it, I realized it wasn’t nearly as hard as I’d thought.

The mystery had made it seem unattainable.  But once that curtain was raised, it was like an entire slew of mental obstacles were removed and finally, I was able to try.

Just try.

And really, that’s all you need to do.  Will you (or I) ever be a gourmet chef?  Certainly not.  That takes a natural talent and passionate dedication I know I’ll never have.  And will I mess up?  Certainly.  Many a meal has turned out less-than-savory or completely inedible due to mistakes on my part.

But, just like anything else, mistakes are how we learn.

What bothers me more, my friends, than a lack of desire to try (after all, that’s your prerogative) is the lack of desire to make an effort for just yourself.

The military takes my husband away for the occasional week or 6 at a time.  And, when he’s gone, I live like a single person — a single person who’s not allowed to date or have sex with anything other than a battery operated device.  So.  You think I’m just going to keel over and subsist off of nothing but Kraft Macaroni and Cheese and Tuna Helper for the duration of his absence?

Heck no.

I mean, I keep those things around.  Don’t get me wrong.  And sometimes I do resort to making them, especially on nights when I’m feeling particularly lonely and nostalgic for the simplicity of the boxed meals of my youth.

But the truth is, the nights I feel the best are the nights I take the time to do something for myself. When I get home, pour myself a glass of wine, turn on some music or the news, and set to work.

For me.

Work, it turns out, isn’t so bad when you get to enjoy the fruits of your own labor.  And the process itself is a great wind-down from the day.  Start boiling the pasta; set a pan of bacon sizzling on the stove; mince up some garlic; grate some Parmesan; saute some frozen corn; toss it all together with some egg yolk and pasta water, and we have a creamy, satisfying pasta carbonara for one.

It sounds like a lot of work, but this can be done in 15 minutes.  Just buy yourself a decent knife and take the time to learn the basics — like how to mince a clove of garlic and how to boil a pot of water.

Trust me — if you can learn to follow directions, you can learn how to cook.  That is to say, if I, Ms-how-much-water-do-I-need-to-cook-pasta-and-what-pray-tell-is-a-“pinch”-of-salt? can do it, than you most certainly can do it.

If you want to.

So.

Go to the “Living and Learning” tab at the top of my page.  Click “Down the Hatch.”

Then, pick one.

Make a half batch of this chili.  Bring the rest to share with co-workers, or live off of the leftovers for days.

Make yourself a Grilled Veggie Sandwich.  The flavor will surprise you in a very, very good way.

California Grilled Veggie Sandwich

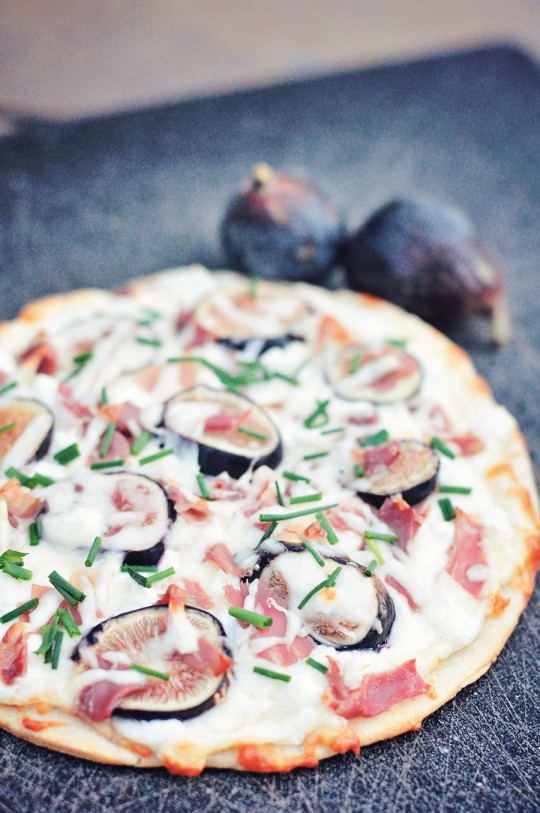
Feeling daring?  Make this pizza.  Six ingredients never tasted so good.  Your tastebuds will thank you profusely.

Or, do like I did last weekend and make yourself a mini appetizer plate — mine had mixed olives, smoked salmon, dill cheese, and chocolate.

Best. Dinner. Ever.

The point, dear friends, is that you really are worth it.  So much more than shampoo, feeding yourself well makes you feel good from the inside.

You only get one body, and consistently stuffing it with processed junk isn’t doing it any favors.

Besides.  If YOU’RE not worth the effort, then who is?

Didn’t Think Chicken Could Turn You On? Think Again.

If you’ve been following my blog for a while, you probably already know that I don’t cook a whole lotta plain ol’ chicken dinners.

Every now and then I get a hankering for a lightly salted and peppered drumstick thrown on the grill with those lovely little blackened bits and maybe a side of coleslaw.  But usually, if I’m cooking chicken, it’s getting the royal treatment — like tossing it with a gooey, caramelized, Adobo-spiced sauce for tacos; bathing it in a hot-tub of rich red wine and veggies and fancified with a French name; or safely tucking it inside warm biscuits filled with melty cheese and salsa.

And dinner from the other night was no exception.

I thought was simplifying my life by making some simple, roasted chicken.

I thought wrong.

This ain’t yo’ mama’s chicken, kids.

This chicken is sophisticated.

It should probably be wearing a maroon chenille bath robe and smoking a pipe, with all its delicious snobbery.

I have to say that not only is this probably the best chicken I’ve ever encountered, but it’s probably one of the best meals I’ve ever made.  I’ll keep this one in the vault for when I need something to impress company or for when I need to make myself feel really, really special.

It’s Roasted Chicken in Marscapone Mustard Marsala Sauce, and I have a woman named Rina from I Thee Cook to thank for the original recipe.  Don’t be thrown by the “mustard” in the title.  It tastes nothing like mustard.  It tastes like slowly melting angels on your tongue.

Or something less… violent.

I’m not gonna lie — there are a couple of splurge-worthy items in the ingredient list.  But don’t skimp or substitute for something cheaper — using the real stuff is so, so worth it.

For the chicken itself, you will need:

  • 4 drumsticks and 4 thighs (I used 4 leg quarters.  Anatomy lesson: leg quarters are a thigh and drumstick still attached to each other.  Math lesson: 4 leg quarters, each with 1 drumstick and 1 thigh, equals 4 drumsticks and 4 thighs.  Economics lesson: You wouldn’t believe how much money it’ll save you to buy your chicken parts still attached to each other. Who knew cooking could make me so smart?)
  • 1 tsp. kosher salt (next time I will cut this back or out completely — mine was a little on the salty side)
  • 1 tsp. black pepper
  • 1 tsp. onion powder
  • 1 tsp. garlic powder
  • 1 tsp. dried thyme
  • Optional:  1-2 Tbsp. olive oil (I added this to the dry rub to make it a… wet rub.)

For the sauce, you will need:

  • 2 oz. pancetta, diced (pancetta is kind of like bacon, but not. Do NOT substitute bacon! The closest I could get was pre-diced stuff in front of the deli counter at my fancy grocery store. I used the entire container, which probably has something to do with why my chicken was a wee bit salty)
  • 6 garlic cloves, peeled
  • 6 shallots, peeled and halved (these are like tiny onions — you can get them in most grocery stores near the onions)
  • 1/4 cup Marsala wine
  • 1 (16 oz.) can chicken broth (Rita uses fat-free and sodium free. I did not. Again, probably contributed to my salt factor.)
  • 1 Tbsp. chopped FRESH thyme
  • 1/2 cup Marscapone cheese (this is a little like cream cheese. But don’t use cream cheese. Use Marscapone. Thank you.)
  • 1 tsp. coarse ground mustard (I just used regular ground mustard because that’s what I had)
  • 1 tsp. honey
  • 1 Tbsp chopped fresh parsley
  • 1/4 tsp. kosher salt
  • 1/8 tsp. black pepper

Whew.  This looks a little overwhelming, I know, but half of that is me rambling about the ingredients — not the ingredients themselves.  And you’re about to see that it’s really not difficult to make.

1)  Preheat your oven to 375 degrees F.  Combine the teaspoon of salt (next time I will leave this out if I don’t use sodium-free broth), teaspoon of pepper, teaspoon of onion powder, and teaspoon of garlic powder.  I added a little more than a tablespoon of olive oil to this rub and then spread it all over the chicken.  Place the chicken in a roasting pan (I used a glass pan because that’s what I had), and bake for about an hour (until a thermometer reads at least 180-degrees F).

Whew.  That takes care of the first set of ingredients.

2)  Gather your pile of shallots and garlic cloves.  Whisper sexy words into their ears while slowly peeling off their layers.  The goal is to get them naked.  Or, you could just chop off the shallot heads, then cut them in half from root to tip, and peel them that way.  Smash the garlic cloves with the side of your knife and the peel should slip right off.  Normally I try to pick love over violence, but it’s definitely faster this way.

3)  Meanwhile, grab your container of pancetta.  Try to ignore how much you spent on it.  Trust me, it’s worth it.  Toss it into a pan over low heat and cook for about 5 minutes.

4)  After 5 minutes, remove the pancetta from the pan and set aside.  Then toss your naked shallots and garlic into the lovely grease left behind, increase your heat to medium, and saute the garlic and shallots for 10-15 minutes until nicely browned.  Don’t panic if your shallots fall apart a little.  And if some smaller pieces start to get a little too brown, simply remove them from the pan and toss them in with your pancetta.  When it’s all cooked, remove every morsel from the pan and set aside with the pancetta.

5)  Add the 1/4 cup of marsala wine to the pan to deglaze it, and let it cook down for a few minutes.  Then add the 14 oz. chicken broth, shallots, garlic, pancetta, and also 1 Tbsp. chopped fresh thyme, 1 tsp. ground mustard, and 1 tsp. honey.

6)  Cook the sauce, uncovered, for about 10 minutes.  If it will still be awhile before the chicken in the oven is cooked, throw a cover on it and reduce the heat to low to keep it warm until the chicken is just about done.  When you’re about ready to serve, stir in the 1/2 cup of Marscapone cheese.

It will melt and give the sauce a nice, thin, creamy consistency.

7)  Remove the chicken from the oven and move it to a serving dish.  Pour the sauce, shallots, garlic and all, over the top of the chicken.  If I’d used a fancier serving dish than my ugly blue one, this would have looked stunning.  And the smell?  I can’t even describe it.  Incredible.

Oh, my.

This is nothing short of delectable.

Of course, this photo was taken before I poured massive amounts of Marscapone sauce over everything.

Oh, and think you don’t like cooked carrots?  Think again.  Make these, undercook them slightly, and then eat.  They are fantastic.

Enjoy!  Thanks, Rina!!

Stone Soup. With Chicken, Cheese, Spices, and Tortilla Chips.

When I was a kid, I had a book called Stone Soup.  It was about a hungry traveler who wandered into a village one day, but none of the suspicious villagers would offer him anything to eat.  So he somehow found (or brought?) this giant pot, filled it with water, and stuck a stone inside.  A curious villager walked by, and asked the traveler what he was doing.

“Why, I’m making stone soup!” he said.  “It really is an excellent dish — rich and hearty, but could really be so much better with just a few carrots.”

Intrigued, the villager ran home, grabbed some carrots, and tossed them into the soup.

After that, villager after villager stopped by to learn about the interesting soup, and each one contributed something — plump chicken, fresh herbs, hearty vegetables — to “help” the stone reach its full potential as a primary soup ingredient.  At the end, they all enjoyed delicious stone soup together, and the traveler was heralded as some sort of culinary genius.

Of course, I didn’t realize it at the time, but while reading this as a kid, I was learning a valuable lesson about how to trick people into giving you what you want sharing.

And now that the weather is properly chilly, I couldn’t help but think of stone soup last night as I made Nearly Famous Chicken Tortilla Soup contributed to TastyKitchen.com by Sommer from A Spicy Perspective.

As usual, head on over to her site for much better photography and a printable version of her fantastic recipe.

I only recently started getting into soup.  Last year’s post-hard drive crashing discovery of Spicy Tuscan Soup made me realize that soup should be the comfort food of choice come winter.

Spicy Tuscan Soup

Aside from the requisite prep work of chopping ingredients, soup requires very little effort with very big rewards.

And this one — This Chicken Tortilla Soup — is definitely no exception.

*All of the following photos are examples of why it’s so important to have natural light with food photography.  Unfortunately for you, I’m not willing to cook my dinner at 3 in the afternoon, so you’ll have to deal with my funky light photography.

To make it, you will need:

  • 2 Tbsp. olive oil
  • 1 small chopped onion
  • 2/3 cup chopped fresh cilantro (divided)
  • 1 Tbsp minced garlic (yep, I cheated this time and used the pre-minced stuff)
  • 1 (14.5 oz) can diced tomatoes (the recipe doesn’t say whether these should be drained, so I drained them.)
  • 3/4 Tbsp. ground cumin (Can I please take a moment to say how much I love cumin? It’s my favorite spice.)
  • 1/2 Tbsp. chili powder
  • 1/4 tsp. cayenne pepper
  • 2 whole bay leaves
  • 4 cups chicken broth (I used the chicken goop stuff that makes broth when added to boiling water. I hear it’s better than the bouillon cubes, and if you look at the ingredients, I think you’ll agree.)
  • 2 large carrots, sliced thin
  • 1 can black beans, drained & rinsed (optional — this isn’t part of the recipe, but I added them.  Because I’m crazy like that.)
  • 1 whole chicken breast, sliced thin (this means both breasteses.  If you buy your meat at a meat counter, you can get the whole breast, which is 2 halves attached in the center.  If you buy the packaged stuff at the grocery store, what you’re really getting is chicken breast halves.  So in that case, use 2.)
  • 1 1/2 c. freshly grated Monterrey Jack cheese (divided)
  • 3/4 tsp. salt
  • 1 c. crushed tortilla chips, plus extra for garnish
  • 1 avocado, sliced (for garnish)

1)  Heat the 2 Tbsp. of oil in a large pot, then saute the onion and 1/3 cup cilantro and 1 Tbsp. garlic for 3-4 minutes.

2)  Add the can of diced tomatoes, 3/4 Tbsp. cumin, 1/2 Tbsp chili powder, 1/4 tsp. cayenne pepper.  Stir it around and smell the goodness and let it get nice and hot.

3)  Add the 4 cups of chicken broth, then toss in the carrots, bay leaves, and raw sliced chicken breasts.  Bring to a boil, then reduce the heat to medium and let the carrots and meat cook for 10-12 minutes.  Also, this is where you can add that optional can of rinsed black beans.

4)  This is where we get a little crazy.  Take out the bay leaves, then stir in half of the Monterrey Jack cheese (or, if you’re like me, grate extra and stir in about a cup of cheese).

Then, crush up a cup of tortilla chips (I find that placing the chips inside a ziploc bag and using a wine bottle to do the crushing works nicely), and toss those into the soup as well.

Spoon it up into a bowl, add some more cheese, sliced avocado (this is a must), and a few more tortilla chips.

Mmmmm.

Make this today.  If you’re really smart, you’ll start with a rock in a pot of water and get your neighbors to do the rest.

But if you decide to do it yourself, I think you’ll find it’s not that hard.

Enjoy!

I’m Pretty Sure My Dog Was the Happiest Dog

So.  Even though I didn’t get to tell you about the most wonderfully delicious hot dog ever on Tuesday because I was distracted with 2 flat tires (no, not Fat Tires — flat tires. big difference.) and ended up turning hot dogs into a philosophical discussion on life, the post still spurred some interesting and impassioned hot dog comments.

Well.

I hope you didn’t lose steam, because this is the actual hot dog post.  I kind of love it when you comment, because it validates my existence or something.  And I look forward to reading every single one of them.

Anyway.

I love me a good hot dog.

Don’t get me wrong — it’s a rare occasion that you’d ever find one of those pink, plasticy, compressed impersonators that squeak when you bite into them sitting inside of my fridge.  I’ll eat those, yes, but that’s not a proper hot dog.  I’m talking about big, brown, juicy beef franks with real meat grease and manly grill marks.

Source

See what I mean?

The best dog I ever ate purely for the meat taste factor was actually at a Five Guys restaurant.  Yep, a fast food joint.  Once I moved mentally past the oddity of a hot dog split lengthwise down the middle, the thing was gone in 3 bites flat.  It was insanely good, to the point where it probably didn’t need a single topping.

But.

The great thing about hot dogs is that your options are really limitless when it comes to dressing it up.  It just never occurred to me how limitless until my brother took us to Happy Dog in Cleveland.

Source

When he parked outside of the dark, corner bar, I was thinking, Great!  Pre-dinner drinks!

I definitely wasn’t thinking, Great!  Dinner!

Until, that is, I saw the menu.

I’m sorry once again for the blur.  It was pretty dark in there, and all I had was my cell phone camera.

For someone who’s terrified of making decisions, this menu was daunting, to say the least.  The first part was easy — I just had to choose between a veggie dog and a real dog.  Um… do they even know me?  (No, but they probably should.)

I checked the circle for the real dog and moved on.

Uh-oh.

So many things to try!

What’s Brazilian chimichurri?  And would it taste good with Oaxacan red chile and chocolate mole, topped with Polish ‘cwikla?

And is it socially acceptable to order a hot dog chopped with Korean kim chee, Greek feta cheese, and Marcella’s grape jelly and chile sauce?

Are we allowed to mix ethnicities, or is this a segregated hot dog joint?

Is this going to end up with me mixing a bunch of things I like but they don’t actually taste good together?

What’s more, if I don’t know what these things taste like alone, how am I going to know if they’re good together?!

OMG-if-someone-doesn’t-help-me-soon-I-might-die-from-overstimulation-caused-by-50-topping-choices-and-countless-combinations-and-where-is-my-frickin’-BEER?

Then, just when I started to break into a cold sweat, the server told me they had a suggestion menu.

My savior.

Among the suggested options were:

“Childhood Favorite”: ketchup, traditional yellow mustard, chopped onions, Spaghetti O’s, and nacho cheese.

“(no title)”: Bertman’s Original Ballpark mustard, killer steak sauce, bourbon baked beans, habanero pickled red onions, and Frito corn chips.

Justin ended up choosing the “Happy Dog Favorite” with Cajun mayonnaise – Remoulade, bacon spiked southern style beans, smoked Gouda cheese, and a sunny-side-up fried egg.  Or maybe it was the one with chipotle hollandaise, cheddar cheese, Nueske bacon, and a sunny-side-up-fried egg?  I can’t remember.  But it definitely had an egg.  And I’m pretty sure he ordered Gouda.

Wowza.

I ended up getting a bit fancy, choosing a title-less suggested combination of bacon-balsamic marmalade, pineapple-ginger chutney, caramelized onions, and French brie cheese.

And then I died.

And then I came back to life so I could finish the dog and name it “Sweet ‘n Savory a la Bacon with a ‘Stache.”  I’m not sure why.  It just works.

And then I died again.

I still have dreams about it.

My only complaint is that the bun wasn’t fantastic.  In fact, I had to finish the dog with a fork and knife, which is like… hot dog defamation, but what’s a girl to do when her brie is jumping ship?

Happy Dog really should invest in some sturdier buns, or even toast them to ensure they can handle the smorgasbord of deliciousness that gets piled on top, making even happier dogs.

After all, you can’t build a skyscraper on a soggy wetland.  Otherwise you get… I don’t know… The Leaning Tower of Pisa?

On the back of the menu is a simple choice of sides: tater tots or french fries, followed by a not-so-simple choice of dipping sauces and toppings.  I especially enjoyed the saffron aioli and the raspberry crunch mustard.

Just not together.

Pair your custom dog and tots with a Stella Artois (for me) or your beverage of choice, and the result is one happy dog.

Thanks, brother.  You know me so well.

Bump, Grind, and Shake that Moneymaker — Start Monday Off Right.

Great news!

We have a solution to the coffee bean situation and my dependency problem.

I know, you’ve probably been worried about that since Thursday.

NO, I am not doing the healthy thing and quitting coffee.  Trust me when I say that would not be the healthy solution for those around me.  I was on Day 2 of super expensive salted caramel mochas from Starbucks — you know, the drink that’ll top your allotted caloric intake for the day in one, deliciously fell swoop, and I was starting to think that it wouldn’t be so bad, going to work solely to pay off my new expensive coffee habit and finally caving to the muffin top threatening to spill over my pants.

But then.

Then Justin saved me by being brilliant.

And that’s the thing about spouses: Just when they start to get under your skin and you’re working up the nerve to suggest that maybe you should live next door to each other instead of with each other because then there’d be no more whiskers in the sink and it would be quiet when you want and there would be no snoring in the middle of the night — just when you’re about to explain how if he never buys any computer stuff ever again and you start buying regular coffees instead of salted caramel mochas, it’s possible you could afford another house next door — just when all that is about to happen, spouses go and do something brilliant, and you’re reminded that you would probably miss the stupid whiskers in the sink.

So this brilliant thing Justin did is he remembered that somewhere in the bowels of our kitchen cabinets we had stowed away a Magic Bullet.

And no, not that kind of Magic Bullet, you dirty, dirty readers.

That’s a silver bullet — not to be kept in the kitchen, lest it be confused with this kind of bullet:

The as-seen-on-TV kind.  Basic cable.  Not Showtime.

A friend once gave it to me as a birthday gift, and now, almost 8 years later to the day, we’re putting it to use.  Because it grinds coffee beans.  As Barb pointed out in the comments of last week’s post, it’s not the most pleasant sound to listen to first thing in the morning.  BUT.  But it only takes 3-4 seconds of pain before I can smell those fresh ground beans, and then.

All is right with the world.

Except.

Except now I’m kind of terrified because it’s my turn to do something brilliant.

See, Justin’s probably about ready to buy tent for me to sleep in the back yard, because I haven’t done anything brilliant as of late and am starting to get annoying.

Enter last night’s cocktails.

We’re not normally “cocktail” kind of people.  We’ll usually crack open a bottle of wine or pour a couple of fizzy beers come happy hour in our household, but last night?  I pulled out the shaker and made something a little more… buzzworthy.

(Blurry photo taken with my camera phone.  But this time it might not be the phone’s fault it’s so blurry.)

So buzzworthy, in fact, that you’ll forget to take a photo until after you drink it.

In case you missed the recipe last night on the Domestiphobia Facebook page, here it is.  A recipe from my friend Mel for the (Almost) Perfect Sidecar:

  • 2 chilled martini glasses
  • Sugar
  • 3 Tbsp fresh-squeezed lemon juice (I’m told the bottled stuff leaves an aftertaste).
  • 2 Tbsp. Cointreau (it’s a liquor made from bitter oranges — you could probably substitute with less-expensive Triple sec)
  • 1/4 C. brandy
  • 4 brandied cherries (2 each) I’m lucky because Mel made these herself and then gave me some, and now I’m spoiled for life.  But don’t worry, you can buy them, too.

Simply fill your shaker with ice, pour in the lemon juice, Cointreau, and brandy, and shake that moneymaker for a good few seconds after condensation forms on the outside.  Pour the sugar onto a small plate and dip the rim of your martini glasses into it.  Then pour in your drinks and plop in a couple of cherries.

YUM.

These were almost perfect, except for the fact that they called for vanilla sugar, which I didn’t make or buy.  Apparently it’s as easy as adding a vanilla bean to a jar of sugar for 6 weeks, but I didn’t want to wait that long.

And you know what?

I don’t regret it.

Color Me Embarrassed

Well.

Remember, not too long ago, when I ran my mouth about never hearing back from a certain website to which I’d applied for a writing/photography gig, so I just assumed I didn’t get said job?

Well.

You know what they say about assumptions.

And if you don’t, I’m not going to tell you.  Because that would only make me look worse.

It’s probably not necessary to say at this point, but I got the gig!

I’m going to be providing virtual tours of “green” homes and I’m going to get paid for it.

Yep.  They’re going to pay me to do 3 things I love:  Look inside people’s houses, take photos, and write.

This is like, unbelievably cool.  So Jaime, thankyouthankyouTHANKYOU for sending me the job posting and then forcing me to apply.

As those of you who’ve been reading this blog for a little while know, I’ve been having a not-so-mentally-stable time of things over the past year or so.  And while I’m a true believer that life will always be full of fluid highs and lows and nothing ever just stays the same way forever, it’s amazing how people — sometimes even complete strangers — come into your life exactly when you need them.

Don’t believe me?  Just wait.  You’ll see.

The trick is recognizing help when it arrives, trying as many new things as possible, and, most important, paying it forward.

So, who needs help?  Because I’m pretty sure I owe you.

On a completely unrelated note, we ate something amazing last night.

I gave a little preview on the Facebook page last night, but decided I needed to share it here as well.

Because it’s unbelievably delicious.

Fig, Prosciutto, and Goat Cheese Pizza (adapted from blue cheese pizza on Centsationalgirl.com)

1)  Buy one (10 oz.) thin crust Boboli pizza crust.  Sure, you could make your own, but that leaves less time for eating.  Drizzle it with olive oil and bake for 9 minutes at 400-degrees F.  (I’m not sure I would do this step next time — I might just bake the whole thing at once without the olive oil to get it a bit crispier.)

2)  Grate 4-5 oz. of mozzarella cheese, and sprinkle most of it over the partially baked pizza crust.  Then layer with 2 oz. of crumbled goat cheese (or blue cheese or whatever kind of cheese you dream about at night), 4-5 sliced figs, 1 oz. of sliced prosciutto, and a few diced green onions (green part only).  Then sprinkle the rest of your mozzarella cheese over the top.

3)  Bake the whole thing for another 9-10 minutes at 400-degrees F.

4)  Pour yourself a glass of red, take a bite of this warm, gourmet pizza that took you all of 20 minutes to make, and allow yourself a moment to just enjoy it.  Don’t think about the calories.  Don’t think about the cheese.  Just let the medley of flavors — salty prosciutto, rich cheeses, sweet figs — do amazing things — naughty things — on your tongue.

Then breathe.

Everything will be okay.

UPDATE 4/24/2013: I have since made this with fresh figs. It is PHENOMENAL.

DSC_4183_small

Really, I Blog To Make My Friends Feel Like G-List Celebrities.

Oh, and also because it’s like this journal where I can expose all of my innards to the outside world.

Sometimes I have to think really long and hard about the serious things I want to post — things like my quarter-life crisis and joblessness and depression and wanderlust — but I can also track certain life milestones, recipes I like, little things I’ve accomplished around the house, and random thoughts I have.

For example, it’s my day off today, and this morning I’ve already been very productive.  I took each of my mutts for a dip in the lake (without getting attacked by dogs that resemble mop heads or pushed ass-backwards into the water); I caught up on some light blog reading; I tried cyber stalking my little sister’s new boyfriend, but apparently the man is like a steel vault; I ate a piece of toast with some of this fantastic Vintage Bee creamed honey (3rd down on the page) that I acquired from a wine-tasting festival this summer (I know — I couldn’t believe I bought something besides wine either); and I also ate 4 bites of cold, leftover crispy burrito from last night — straight from the fridge.

Hey, if I want to eat cold leftovers for breakfast, that’s my prerogative.

Plus, all this baby talk has made me crave burritos.

Plus, they go really well with coffee.

And you don’t discover these things until you experiment a little.

So, are you interested in making your own burritos so you can eat them cold with a warm cup of coffee?  I’m going to assume you answered yes, since I really wouldn’t understand the alternative.

I got the recipe from a site called Mel’s Kitchen Cafe.  She actually calls them “Crispy Southwest Chicken Wraps,” but I tend to think “burrito” is a better word, since “wrap” makes me think of whole-wheat or sundried tomato tortillas with turkey, avocado, sprouts, and other things you might eat when you want to feel healthy.  But burritos?  Burritos make me think of beans, rice, southwest seasonings, roasted chicken and sour cream — warm things that fill my belly and make me smile.

And that’s exactly what these puppies do.

To make them, you will need:

  • 1 cup cooked rice (I used brown basmati, but really you could use whatever you have lying around)
  • 1 cup cooked, shredded chicken (I bought one of those roasted chickens from the grocery store, since Justin likes to use the leftovers to make chicken salad for lunches. Plus, I’m lazy.)
  • 1 can black beans, drained and rinsed
  • 1 green onion, diced
  • 1/2 red bell pepper, diced
  • 1/4 cup cilantro, chopped
  • Juice from 1 lime
  • 1/2 Tablespoon chili powder
  • 1 teaspoon ground cumin
  • 1/2 teaspoon garlic salt
  • 2 cups shredded cheese (like Mel, I used cheddar and monterey jack)
  • Sour cream (Mel says this is optional, I say it’s not. Though I’m not sure I’d win if we had a street fight over it because while I might be scrappy, she has 4 sons.)
  • Tortillas! This recipe will fill about 6 “burrito size” tortillas. (Totally forgot these on the list when I first wrote the post — thanks, Katie!)

The awesome thing about this recipe is that as long as you have the rice and seasonings, you can really play with the other ingredients as much as you want.

As per usual, especially with any type of taco/wrap recipe for some reason, my photos of the end product are terrible.  One problem is that I don’t have time to cook when it’s light outside.  So, I’d highly recommend visiting Mel’s Kitchen Cafe if you want to see the deliciousness that really comes out of this in the end.

1) Start cooking your rice.  While that’s happening, chop up the green onion, 1/2 of a bell pepper, and 1/4 cup of cilantro.

Go ahead and grate the cheese at this point, too.

Cooking is all about time management.

And wine drinking.

But mostly time management.

2)  Once the rice is finished cooking, stick it in a bowl and add all of the remaining ingredients except the cheese, sour cream, and torillas.

1/2 Tablespoon of chili powder…

1 teaspoon of cumin…

1/2 teaspoon of garlic salt…

Lime juice… this is ESSENTIAL.  Don’t leave this out!

Mix…

Chicken…

Normally, this is where you would add the black beans.  Unless, of course, you set them in the sink to drain after rinsing and completely forgot about them until after your first batch of burritos was already cooked.  Then you would need to add them to whatever filling you have left.  Oops.

3)  Layer the cheese on a tortilla, then give it a couple dollops of sour cream (do NOT skip the sour cream!), then add the filling mixture.

4)  Roll ’em on up, then coat the burritos with cooking spray and cook for a few minutes per side in a skillet that you preheated over medium heat.

They should get nice, goldeny, and crisp.  And messy.

Give ’em a little poorly placed cilantro hat if you want to get fancy.

Sure, they’re not as adorable as baby burritos, but you can eat them, which makes them even better than a baby burrito in my humble opinion.

Meh… okay.  It’s a toss-up.

A Domestiphobe’s Tips for Throwing a Budget Shindig. Because You Can’t Fake Success.

Yesterday, we opened the windows.

Sure, it was still probably 90-degrees out in the afternoon, but the nights have been decidedly brisker, it’s taking quite a bit longer for the heat to get uncomfortable during the day, and we just couldn’t help it.  We wanted fresh air.  The house has been taking on the stale, ice-box smell that happens when it’s been breathing processed air for too long, and I’m sure our lungs were doing the same.

We made it until about 5:00, which is when we decided that a sweat-soaking-into-the-sofa smell would be far worse than stale icebox.  Oh, the problems of the lower-middle class…

Speaking of lower-middle class problems, I feel exhausted from the sheer number of parties I’ve thrown this summer.  Okay, so it was only 2 parties and a couple of get-together celebrations, but for someone as decidedly un-Martha as myself, it felt like a lot.

On the plus side, I’ve managed to maintain a modicum of sanity by avoiding — at all costs — actually hosting the largest of these parties at my own house.  The baby hot tub bash was held at the guest of honor’s house (I know — it’s a good thing Martha doesn’t read this blog — she would roll over in her grave.  If, you know, she were dead.  Which she’s not.  And that’s a very good thing.).

See, Alaina lives about an hour away from me, and it just made more sense to have it where all of her friends live.  Not to mention the fact that her lakeside setting was pretty picturesque.

No real babies were harmed during the party.

My husband’s intimate graduation party lunch was at a restaurant downtown, followed by an unforgettable steak dinner on our back deck.

And, if we’re going to be honest, that’s really my favorite kind of party.  Just a few close friends, amazing food, and wine to suit the occasion.  Which is pretty much any wine.  Any wine you like.

But sometimes, you can’t get away with just an intimate gathering.  Sometimes the occasion — or in this case, tradition — calls for something a little bigger.  See, this has been a pretty big year for Justin.  Not only did he graduate from college, but he made his next rank in the Air Force.  And, as is custom for Air Force promotions, the addition of a stripe called for — nay, required — a celebratory shindig.

Fortunately for his domestiphobic wife, my husband wanted the party at our neighborhood’s lake, which saved me the huge hassle of trying to make our house guest-worthy.  And not just regular guests, but higher ranking “superior” type guests who, even though they try their damnedest to put on an air of casualness in off-duty, lighthearted social settings, still make me nervous that I’m going to say or do or think the wrong thing in my liberal/hippie fashion that would land Justin on some type of unmentionable blacklist for people of uniform.

And we wouldn’t want that.

So I donned my party planning hat for the third time this summer and went in search of an affordable way to host the festivities without breaking the bank.

Fortunately, I didn’t really need to do as much work as I expected due to a few key people:  My friend Danielle and the ladies behind the deli counter where I shopped.  I’m sworn to secrecy about the place, since technically they cost their store money by talking me out of the over-priced sandwich and cookie platters in lieu of a DIY quick assembly that ended up looking great and saved me mucho dinero.

Anyway.  I’ll spare you the wordy details since, as per usual for a semi-stressful event, I neglected to take pictures.  Seriously bad blogger.

But I do want to share a couple of quick tips if you ever find yourself needing to throw a casual, budget-friendly party for 20-30 people and you don’t want to cook.  Because while I might not be able to fake a thriving, lucrative and successful writing career, I learned I can certainly pull together a successful gathering on a dime.

I get by with a little help from my friends.

1)  Have a good friend to help you the day of the party.  I don’t know what I would’ve done without Danielle, who picked up last-minute items from the store and assembled 45 mini-sandwiches and overall kept me laughing and at ease throughout the morning (as opposed to becoming a discombobulated wreck of a stressball).

2)  Don’t splurge on the “fancy” party trays when you can make your own for a fraction of the cost.  The awesome deli ladies let me in on their secrets — buy as many little Hawaiian rolls as you need, plus one slice of meat per sandwich.  I wanted to make 45 sandwiches, so I bought 25 slices of turkey and 20 slices of ham.  I also bought 20 slices of cheese which, when split in half, covered 40 sandwiches.  (Who knew sandwich assembly was so math intensive?)  One slice of meat and cheese was plenty for each tiny roll.

The morning of the party, Danielle assembled the meat, cheese and buns on tray, then filled another tray with lettuce, sliced tomatoes, sliced cucumbers, and sliced onions.  Provide condiments on the side, and viola!  People can create their own little sandwiches to their taste.  The deli ladies were even kind enough to give me one of their plastic lidded trays for free.  I also bought a bunch of cookies and put them on another tray.  Add chips and a couple of sides from generous friends (thanks Christie for the pasta salad and baked beans!), and people will have plenty to munch on throughout the day.

3)  Kegs are overrated.  What?  You heard me.  They’re expensive and you usually need to order them a week or two in advance, and who’s coordinated enough to do that?  Actually, the lady at the military liquor store was kind enough to talk me out of buying one pricey keg and instead buy a variety of beer bottles to put in coolers.  Not only would people have a choice of beverage, but any leftovers (there weren’t any) wouldn’t go to waste.

Seriously, have you ever heard of more helpful store people?  I wanted to leap over their respective meat-and-liquor-laden counters and give them the most heartfelt, squishiest hugs of their lives.

And I’m not really a hugger.

4)  Make a special drink just for yourself (and your helpers).  Whether it’s alcoholic or not, you deserve something apart from what you’re serving the masses.  Don’t ask me why, but it just feels good.  In this case, it was basil-infused peach sangria.

Don’t worry.

The recipe is a-comin’.  And it couldn’t be easier.

Tastes Like Chicken. Only Better.

So the thing I’m beginning to learn about cooking is, it has a flow.

Like the progression of a really good date from the opening of the car door, to the perfect restaurant ambiance, to the nice, slow dance of the will-we-or-won’t-we first kiss, it’s all about timing.

Perfect, delectable, I-can’t-believe-it-worked-out-like-that timing.

As with any true Domestiphobe, sometimes my timing is spot-on (because I’m a perfectionist), and other times it’s… not.

And I’m just going to say, the dinner I made last night was tricky to time.  It was one of those simple meals that looks fancy and feels like it should take a while to make, but is actually deceivingly quick to come together.  Too quick.  Like, twenty-minutes-before-Justin-gets-home quick.

Oops.

So, I’m going to share in mostly blurry photos, to the best of my ability, the sequence in which this simple-yet-fancy-looking-and-tasting dinner should be prepared.  But you should probably start preparing it only about 15 minutes before you’re actually ready to eat it.

Consider yourself warned.

I made this fancy, schmancy halibut picatta with capers (from A Sweet Pea Chef — her photography is amaaaazing).  Halibut picatta is like the chicken picatta you see at restaurants, except with halibut.  Which is a fish.  A delicious fish.  But, truth be told, it’s pretty expensive.  At least around these parts.  So when I make this recipe again, I will likely use a less expensive white fish, like tilapia or cod.  However, if you’re dealing with someone who’s picky about seafood tasting like seafood, I’d recommend  the halibut.  Because it’s meaty, like chicken.  Except it’s fish.

I varied from the original recipe only slightly, because I was impatient and ended up cooking frozen halibut fillets instead of thawed fillets.  I’ll let you know where the change-up happens.

Before you can begin the first date flow process of preparing this recipe, you need to assemble your cast of characters.  I don’t just do this for blogging purposes — it really does make it easier to jive in the kitchen when everything is ready at your fingertips.  You will need:

  • 1 Bunch Fresh Asparagus
  • 2 whole 6-ounce Halibut Fillets, Skinned (I used a package of frozen, boneless fillets)
  • 1 Tablespoon Olive Oil
  • 2 Tablespoons Unsalted Butter, Divided
  • 3 cloves Garlic, Chopped
  • ½ cup Dry White Wine (I just used a cheapo, open bottle of chardonnay)
  • 2 Tablespoons Capers
  • ½ whole Fresh Lemon, Zest And Juice
  • 1 Tablespoon Fresh Italian Parsley, Chopped
  • Kosher Salt To Taste
  • Ground Black Pepper To Taste

Now, for the flow.

Get about 1/2 cup of water boiling in a pot on the stove.  You’ll be using this to steam the asparagus.

Also, in a separate non-stick skillet, add 1 tablespoon of butter and 1 tablespoon of olive oil.  Turn the heat to medium-high and let the butter melt (watch it so it doesn’t burn).

While you’re kind of watching your butter, quickly chop off the tough, thick ends of the asparagus.  Just don’t chop off your fingers because you’re too busy watching the butter.  You’d regret that.

If the butter has melted, go ahead and plop your 2 halibut fillets into the pan.  Whether you’re using thawed or frozen fillets, you want to brown this first side for about 3 minutes.  Sprinkle a little salt and pepper over the top.

If the water in the pot is boiling, go ahead and add the asparagus.  Turn the heat down to low, close the lid tightly, and let the asparagus steam for 7-10 minutes.  Set a timer if you’re easily distracted.

Once the halibut has cooked for 3 minutes, flip ’em over.  They should be lightly browned on the first side.  Now.  Here’s where I differ because my fillets were frozen.  If you’re using thawed fillets, just cook them for about another 3 minutes on the flip side.  If you’re using frozen fillets, stick a lid on the pan, turn the heat down to medium or medium-low (still watching to make sure the butter doesn’t burn), and cook for 6-7 minutes until tender and flaky.

Using a lid on frozen fillets will help them cook through.  You could use a much smaller pan that this — unfortunately, this is the only non-stick pan I have with a lid.

While the fish finishes cooking, chop the garlic, parsley, and zest 1/2 the lemon.

Let’s take a moment to appreciate that super cute curl of smoke above the pan, shall we?

Who knew steam could be cute?

When the fish is cooked, set the fillets aside on a plate.  Turn your heat back up in your butter/oil pan, and add the chopped garlic.  Let it sizzle for about a minute — it will smell heavenly.

Then pour in about 1/2 cup of white wine.

Aren’t you proud I didn’t pour it directly from my glass this time?

Turn the heat to medium and let everything reduce for 5-10 minutes.  Now would probably be a good time to check your asparagus.  When you remove the lid, you’ll notice it’s turned this amazing, vibrant shade of green.

Use a fork and bite into one.  If it’s still super crunchy, put the lid back on and give it a few more minutes.  If it’s steamed to the consistency you like, remove the pot from the heat and push the lid slightly to the side to keep them warm.

Meanwhile, back in the pan, you can turn off the heat.  Add your remaining tablespoon of butter and lemon zest…

…juice from 1/2 a lemon…

…2 tablespoons of capers (you can find jars of these little green ball things near the pickles at the grocery store)…

…and tablespoon (or so) of chopped parsley.

Stir everything together until the butter has melted.  Now would be a good time to taste it.  If it tastes super lemony, add a bit more butter.  If you’d like more lemon flavor, use the other half of your lemon for more juice.  Sprinkle in a bit of salt and pepper as well.

To make this look super fancy, just lay a bunch of asparagus on a plate, top with a halibut fillet, then spoon your sauce over the top.

Notice you can add a couple of lemon slices to make it look not just fancy, but fancy schmancy.

I’d say this is the perfect thing for a Domestiphobe to serve if you’re looking to impress someone, because it’s a lot easier to make than it looks.

And we kind of thrive on that sort of thing.

Just don’t — you know — serve it 20 minutes before that someone gets home.

I’m pretty sure I make these mistakes so you can learn from them.  It gives me purpose.

And so, it turns out, does halibut.

I Have the Dinner Solution for YOU Tonight. You’re Welcome.

I would have had this finished for you earlier, but I got called away for something I will likely tell you about later this week.  Lucky for you, I’m hoping I’m still posting this just in time for you East Coasters to stop and pick up the ingredients on your way home from work.  You West Coasters still have plenty of time, and those of you overseas can have it for breakfast or something.

I am about to share with you one of my absolute favorite dinner recipes in the history of me making the occasional dinner, which has really isn’t a very long history at all.  But that doesn’t change the fact that these are de-frickin’-licious.

I’m pretty sure this is the type of thing that pleases menfolk, womenfolk, and kidlets alike.  I mean, what’s not to like about chicken thickly coated in a tasty sauce and served in a soft taco shell with lettuce, avocado cream, onions,  your favorite hot sauce, or whatever else your hungry little heart desires?

There was once a time when I rarely strayed from the usual ground beef and taco seasoning tacos.  But then I tried these.  And now I’m hooked.  The flavor is out of this world, and while the original recipe calls for all Goya brand products (usually found in the Hispanic shopping aisle of the grocery store), you really can use any brand you like.

Except for the Adobo seasoning.

But we’ll get to that in a minute.

Why haven’t I shared this recipe with you sooner?  Well, to be perfectly honest, it’s because every time I make it and try to take pictures, the photos turn out terrible.  I don’t understand it.  And I absotively, posolutely, cannot take a decent picture of a taco.

Did that sound dirty to anyone else?

And if you’re not into tacos (har-har), the chicken from these is great with nachos.  I’ve even added it to creamy cauliflower and garlic soup that had turned out pretty bland, and this gave it a great southwest kick.

Okay, NOTE:  The original recipe calls for bone-in, skin-on chicken breasts, but I find it much easier to use boneless, skinless breasts.  The result is still very tender, cooked chicken, so I don’t really see the extra point of going through the work of dealing with the bones.  

To make it the way I did, you will need:

  • 2 (8 oz.) cans tomato sauce
  • 2 teaspoons white vinegar
  • 3-4 cloves garlic, minced
  • 3 1/2 teaspoons ancho chile powder (I used regular chile powder since that’s what I have already — cut this amount back to taste if you don’t like things very spicy.)
  • 1 teaspoon ground cumin
  • 2 teaspoons dried oregano
  • 1/2 teaspoon sugar
  • 2 tablespoons olive oil
  • 1.5 – 2 lbs. boneless, skinless chicken breasts
  • Goya Adobo with Pepper, to taste
  • Flour or corn tortillas

See the Adobo seasoning?  It’s basically like a seasoned salt, and really yummy.  I highly recommend picking some of this up in the Hispanic food section of your grocery store.  Make sure you get the one that says “with pepper.”  You will very likely find yourself using it with more than just this recipe.

1.  In a small bowl, mix together the first 7 ingredients: 2 cans of tomato sauce, 2 teaspoons of white vinegar, minced garlic, 3 1/2 teaspoons of chile powder, 1 teaspoon of cumin, 2 teaspoons of oregano, and 1/2 teaspoon sugar.  Don’t ask why there’s a full teaspoon of sugar in the above picture.  That was probably an accident.  A very happy accident.

Also sprinkle in some of your Adobo seasoning.  I’m pretty liberal with this stuff.  Feel free to taste your sauce as you go, so you see which flavors each seasoning is contributing to the overall taste.  It’s a good way to learn.

2.  Heat your 2 Tablespoons of olive oil in a very large skillet over medium-high heat.  Sprinkle more Adobo seasoning over both sides of your chicken breasts, and when the skillet is hot, add the breasts and cook the chicken for 2-3 minutes on each side until they’re lightly browned.  They will NOT be cooked through at this point, and that’s exactly how we want it.

3. Add the tomato sauce mixture to the pan and bring the liquid to a boil.

Honestly?  If you had the pan hot enough to begin with, the sauce will get hot pretty quickly.  Since tomato sauce tends to splatter when it boils, I usually just give it a quick stir, cover the chicken, and then turn the heat down to medium-low.  It’s VERY important that you cover the pan!  This will help your chicken get nice and tender.

Simmer it like this for about 10 minutes, then remove the lid ONCE to flip the breasts, then put the lid back on and don’t touch it again for another 10 minutes.  The chicken is cooked when it’s no longer pink inside.

4.  Once the chicken is cooked, remove the pan from the heat and set the chicken breasts on a plate or cutting board.  Leave the rest of the sauce inside the pan!  Use 2 forks to shred your chicken up into nice pieces.  If you did like I asked and left the lid to the pan alone, the chicken should shred pretty easily.

5.  Add the shredded chicken back into the pan, mix it around with the sauce, and let it cook (without the lid this time) over medium-low heat for about another 10 minutes until the sauce thickens up and begins to caramelize.

There really shouldn’t be much “loose” sauce in the bottom of the pan by the time it’s done — it will all be thick and coating the chicken.

Can I get a mmmmmmm?

That’s it!  Then you just stuff the chicken into your tortillas (preferably warmed), garnish with whatever you like, hold them in front of your mouth, then inhale until everything lands in your stomach.

I like mine pretty plain with sour cream or avocado cream (mashed avocados mixed with sour cream, salt, pepper, and garlic), but you could easily go with the works on these — lettuce, tomatoes, hot sauce, onion, lime, etc.

Wow, that photo doesn’t make these look very appetizing.  But trust me — they are.

These have replaced the brisket tacos I wrote about here.  Why?  Frankly, the chicken tacos are cheaper and I like them better.  The brisket tacos were easy since they were made in a slow-cooker, but… I don’t know.  You’ll just have to try these.  Then you’ll understand.

Here’s one with sauteed red and green peppers on a whole wheat tortilla.

Yummy.

And, like I said before, the meat is versatile.  Try the leftovers on cheesy baked nachos or in a creamy southwestern soup.

Let me know if you come up with some winning combinations.

I might be slightly addicted to this stuff.

Enjoy!

**UPDATE:  Woohoo!  I found a still-not-great-but-halfway-decent-which-is-like-25%-more-decent-than-the-other-taco-pictures taco picture!  I was going through some old memory cards and found this one, which I must have taken yet another time I made these, apparently still searching for the ever elusive good picture of a taco.  Seriously, if you have any tips, I’d greatly appreciate it.  Thank you.

She still looks a little… I don’t know… sparse?  Naked?  This one has avocado cream, and I promise you — the flavor of the chicken combined with this is more than enough taste to go around.