
How To Build An Industrial Chic Closet Organizer (Part 2) – AKA. My Closet Is Still Cooler Than Me.
It’s finally time, m’dears, to reacquaint you with a little project of mine.
It’s a project that’s going to make all the guys hate me because all of the girls are going to want the guys to build it for them but I have news for you, you conniving girls: While Justin was deployed to Afghanistan, I built this baby with my own bare hands (and also a power drill and several bottles of beer) and you can, too.

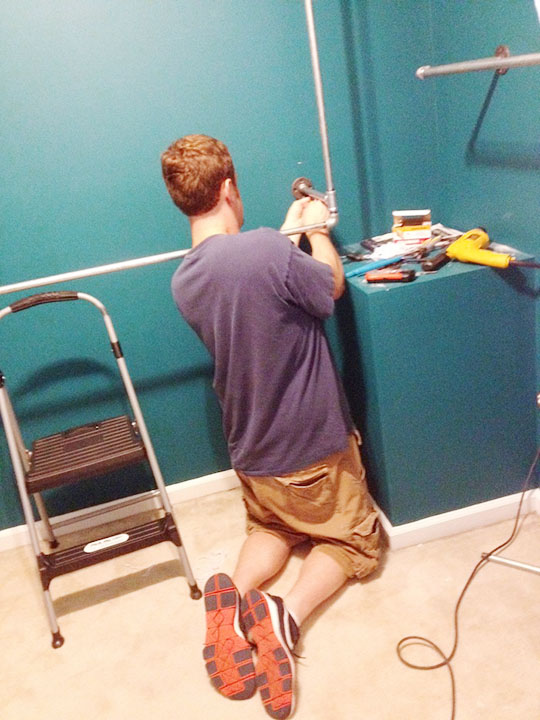
I did have a little help, though. The awesome Kelly at the Home Depot in Fayetteville, NC was kind enough to cut approximately eight-bajillion pipes down to size for me, and one of his cohorts cut all of my shelving to spec. And my friend Alaina’s husband, Dirk, had to help me hang it because their baby wasn’t strong enough to hold it up yet.

Weakling.
So the last time I talked about this thing was August of 2012, when I gave you all kinds of great details about how to prep your closet for your new super chic organizer, information about what kinds of galvanized steel pipes and fittings you might need, and a list of the various supplies I needed in order to build different parts (like shelf supports and hangar rods) to my specifications.
You know, the boring stuff.
But now that I’ve had several (try eight) months to test it out, we can finally move on to the good stuff and you can see how it all came together. I believe the only photos you’ve seen were ones that showed the (mostly) finished closet with only a few clothing items for scale, like this:
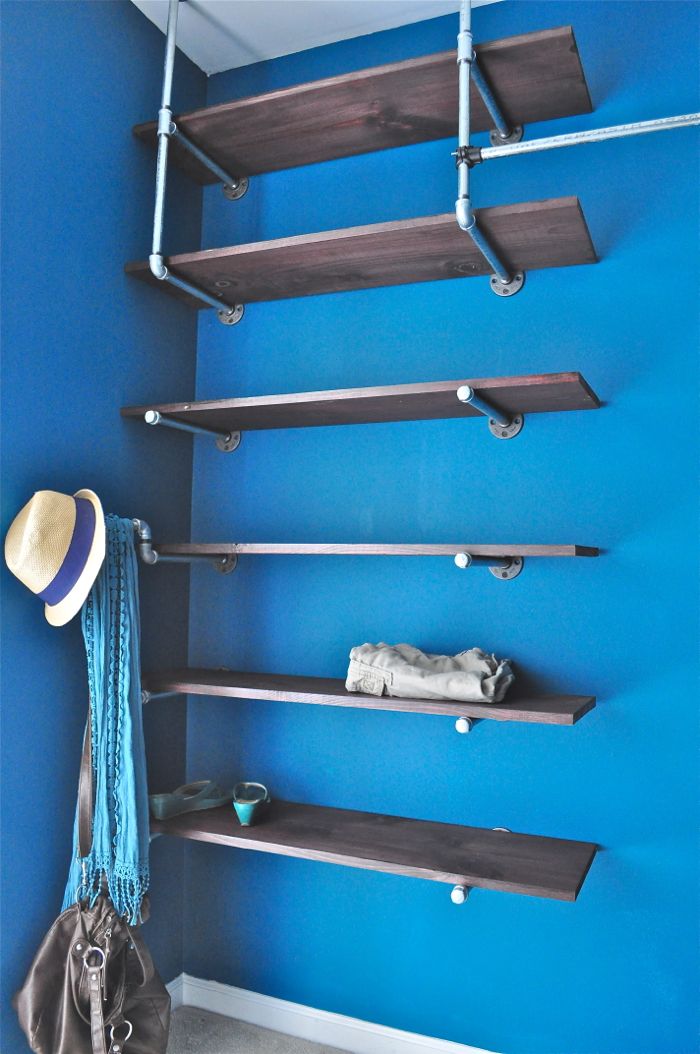
But now, ladies and gents, I can finally show you the finished project.
After, of course, I show you the rest of the steps. Because once you have your plan and all of your pieces, you still have to assemble.
Step 5: Assemble
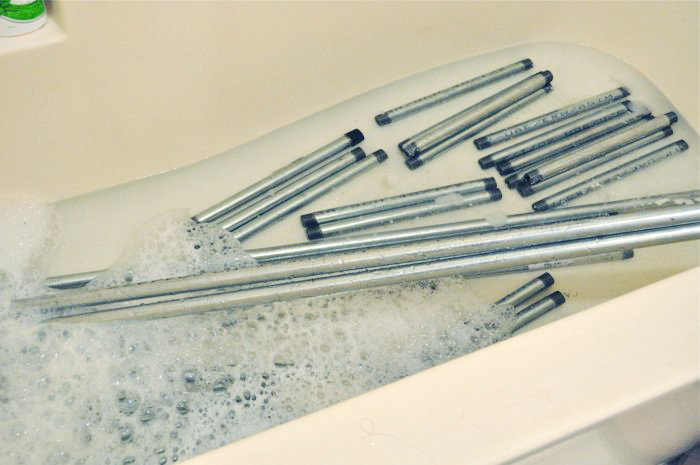
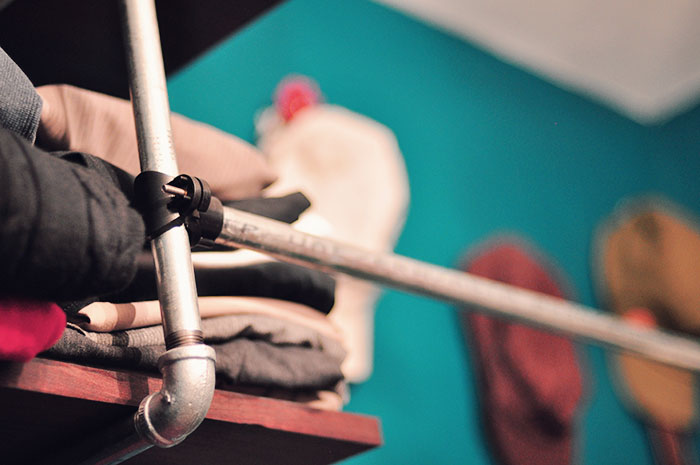
What I didn’t realize when I started this project was that my galvanized pipes wouldn’t exactly be ready-to-go when I arrived home. They were super oily from the cutting machine, and they had these sharp little “teeth” embedded into them where the machine gripped the pipes:
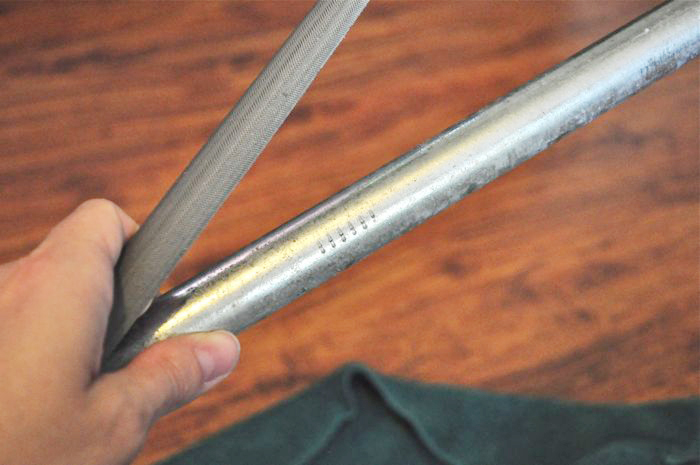
So I used an inexpensive metal file (that thing sticking out of my hand above the pipe) to file them smooth. It was really quick and simple. Then, I soaked the pipes in a bathtub filled with water and dish soap to de-grease them:
And I laid them on some towels to dry:
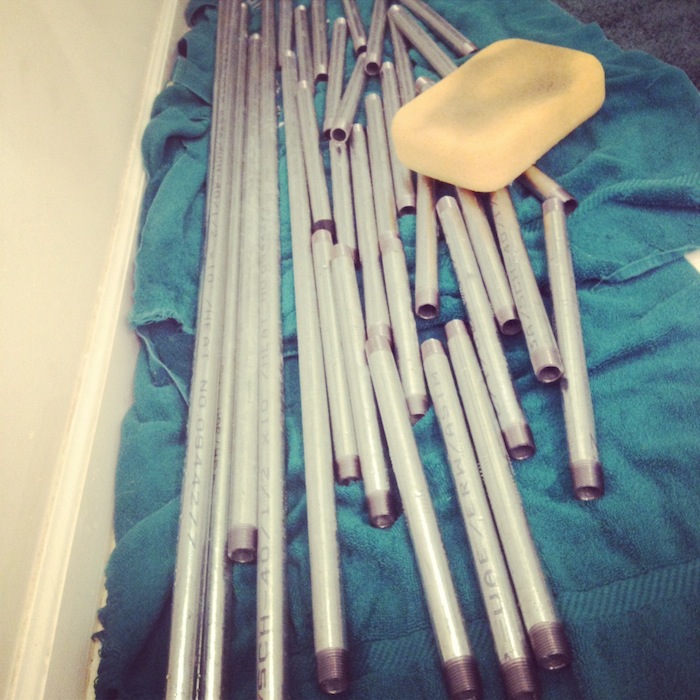
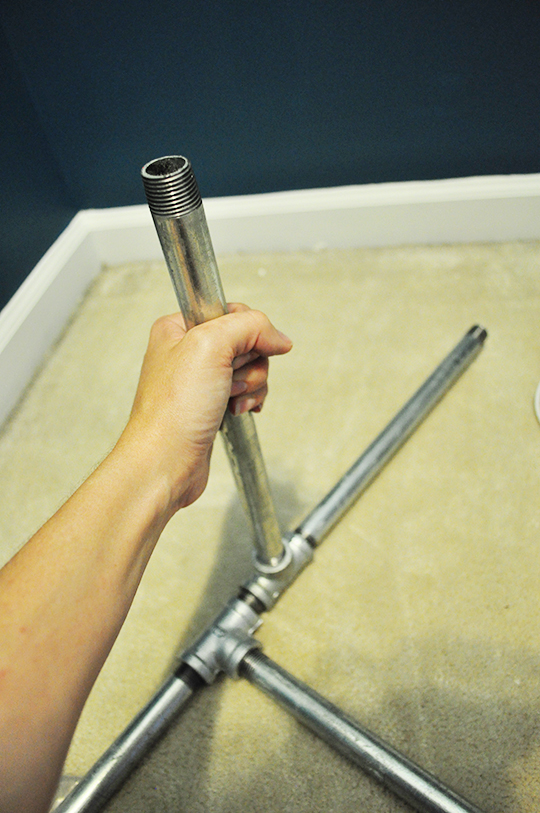
I let them dry overnight to make sure I didn’t trap any water inside, and then it was time to assemble. Simply twist the parts tightly together…
And viola!
Tips:
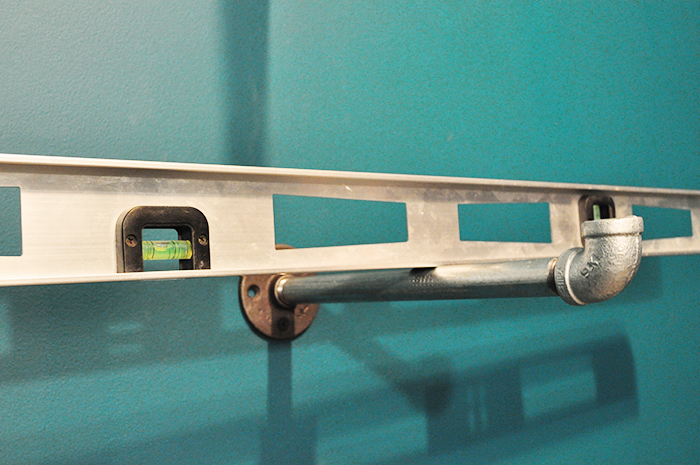
You can’t make a closed circuit. You just can’t. If you try to make a closed circuit with your pipes, you’ll be screwing one end of the last pipe in while unscrewing the other end. That said, I did it anyway. In the photo above, I was able to fanagle the long pipe on the right — the one between the two “T” fittings — into the structure. (That pipe ends up being the lower of the two hanging bars of the unit on the back wall.) It can twist and spin because there’s some give on either side of the threads, but the entire piece is designed in such a way that it’s impossible for that bar to come out once the unit is hung.
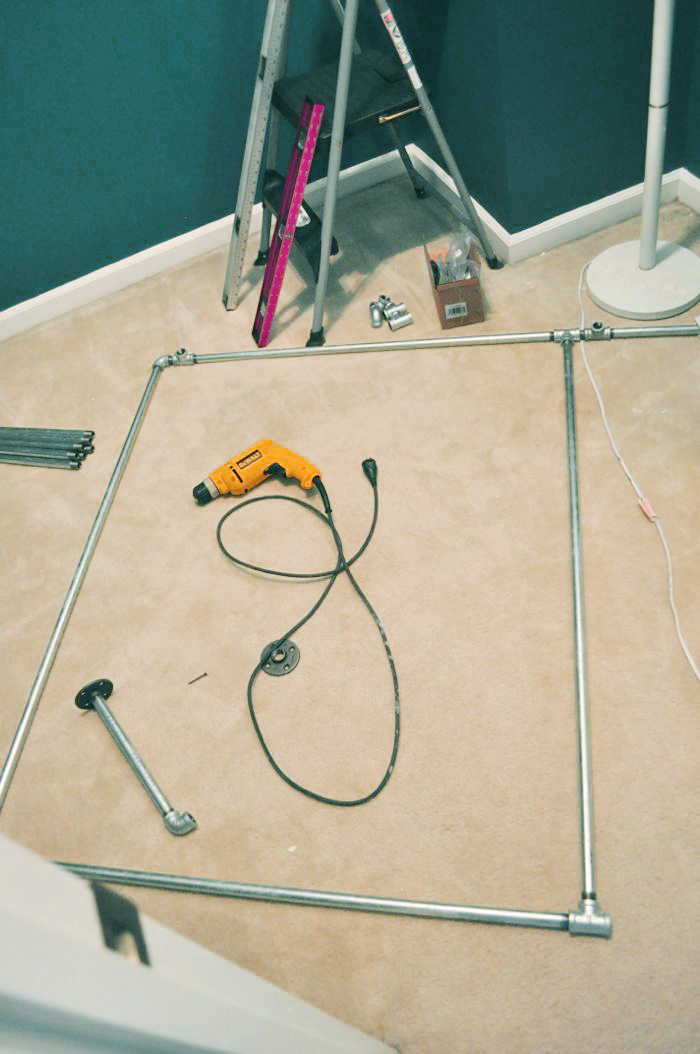
They don’t all have to be super tight. The threads grip so well that you can use them to adjust — screwing and unscrewing as necessary — to make sure everything is level.
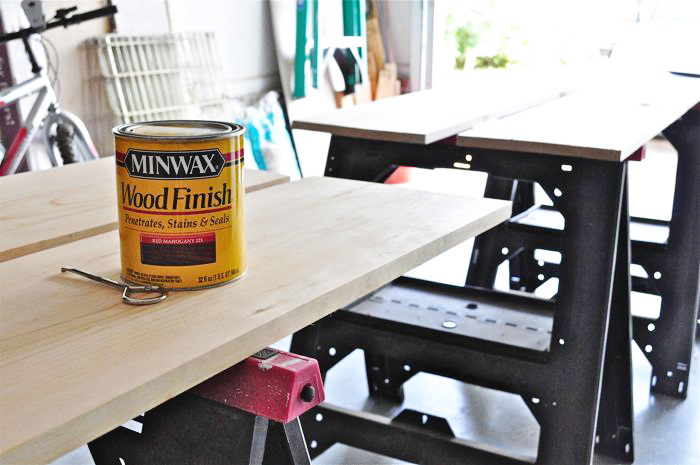
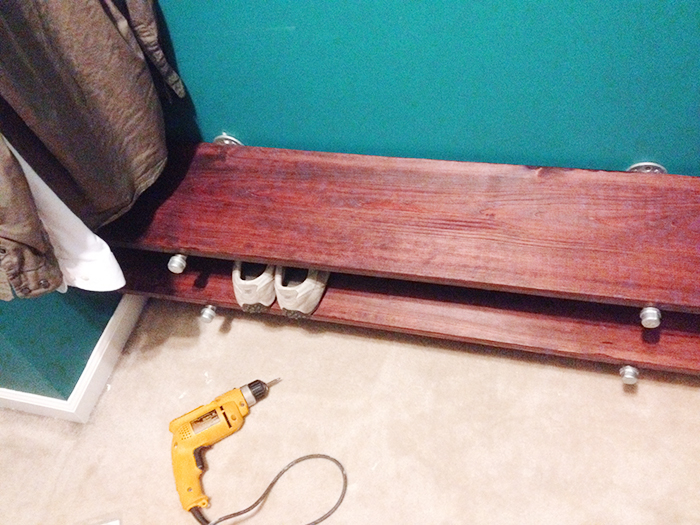
Step 6: Prep Shelves
Like I said before, Home Depot was kind enough to cut my shelves for free, so all I needed to do was stain them. (If you want a more “finished” look, buy some pre-made shelves with a finished edge.) I used two coats of Minwax stain in mahogany, applying it with a foam brush, letting it sit for about ten minutes to penetrate, and then wiping it with a rag.
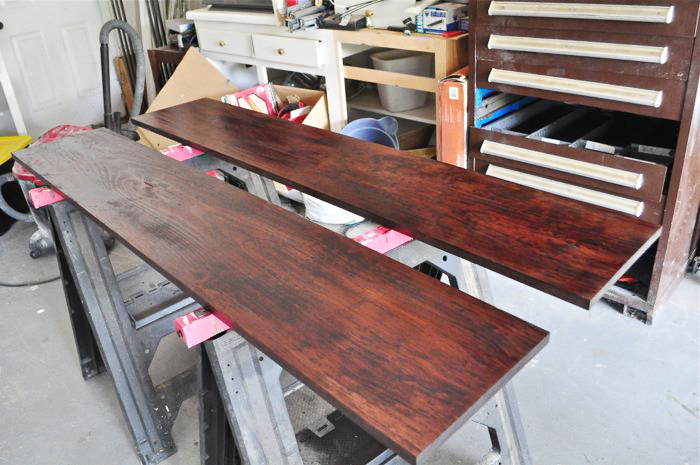
They weren’t perfect, but I figured that worked with the rustic look I was going for, anyway.
Since my shelf supports were made of flanges attached to the wall and 12″ pipes, the 11.25″ wide pine boards (they’re labeled as 12″ wide in Man World for some reason) fit perfectly once the fittings are screwed in.
Step 7: Mount
Seriously? With all of the mounting and screwing and nipples in this project, I’m probably going to get a lot of disappointed search engine visitors to my site.
Sorry about that, folks. But in all honesty, this closet organizer is a total turn-on for me, so I’m pretty sure it could be for you, too.
Moving on.
Mounting these puppies to the wall is pretty straight forward. I used two screws per flange. (I bought these # 6 x 1-5/8 in. drywall screws from Home Depot, but I’ve since found these drywall screws even cheaper.)
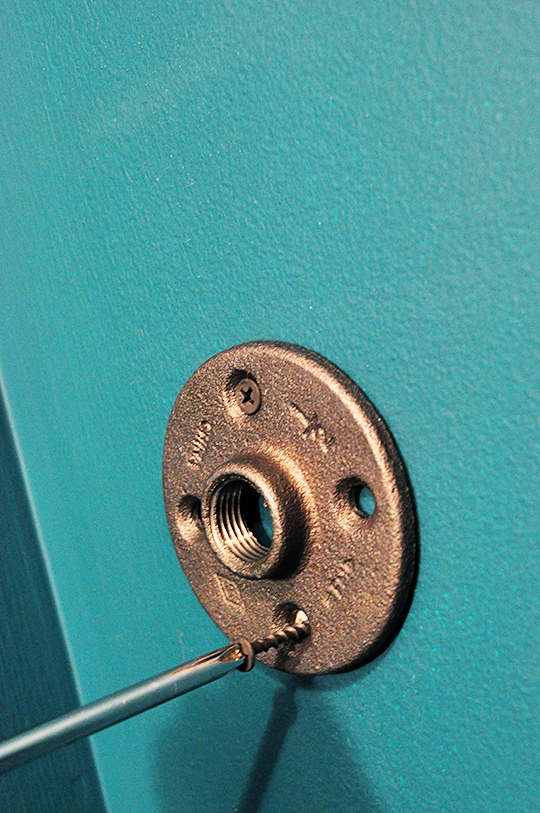
The individual shelf brackets were easy peasy, but the larger units required some help. I designed most of the system so that the flanges would screw into studs. If you build this yourself, I highly recommend that you plan to screw studs. I mean INTO studs.
Mind, meet gutter.
I used anchors in a couple of places so the supports would be more aesthetically pleasing, but if you want to err on the side of safety, use studs. Or at least better metal anchors over these large plastic ones.
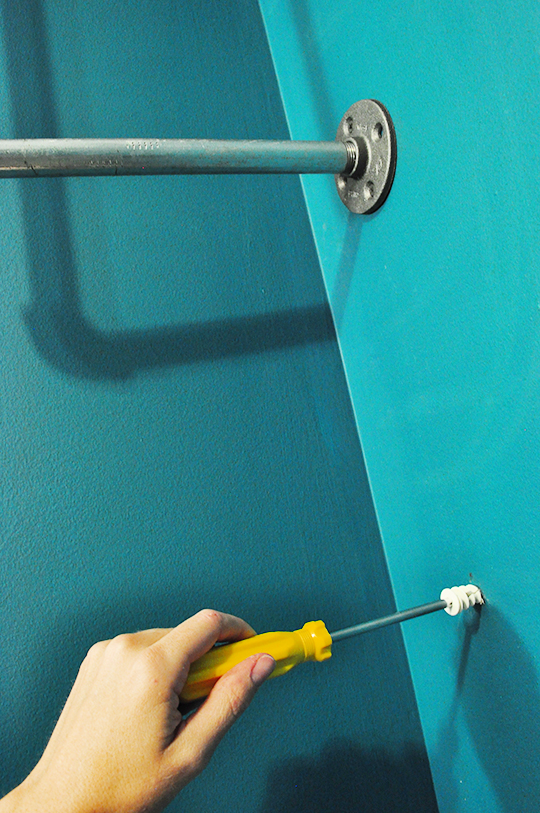
Also, I was constantly checking to make sure things were level.
Once all of the supports are secure, add the shelves! As long as your supports are far enough apart, the shelves just rest on top of them.
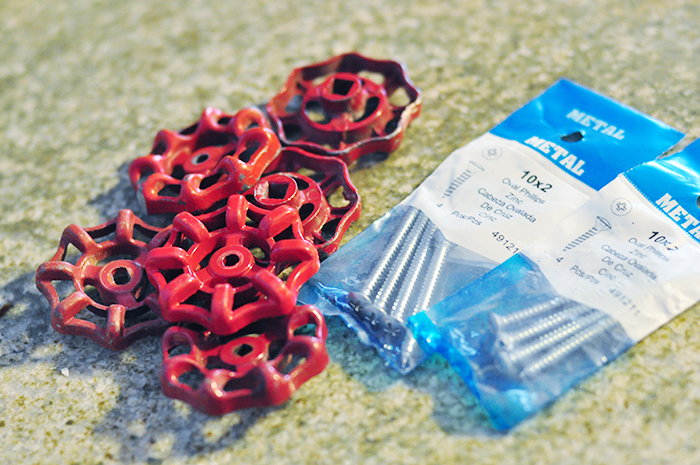
Step 8: Accessorize
I knew I wanted some wall hooks to hang hats and whatnot, so I ordered some red faucet handles from Etsy, (I also found these pretty, shiny new ones) glued them onto some screws, and attached them to the wall with anchors.

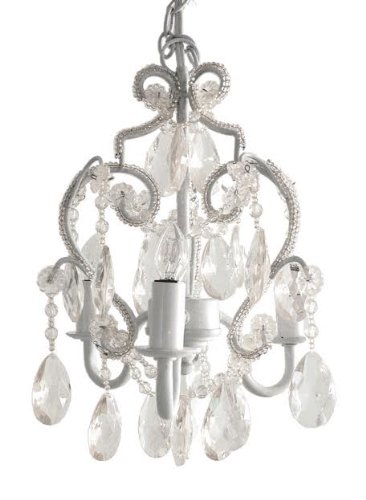
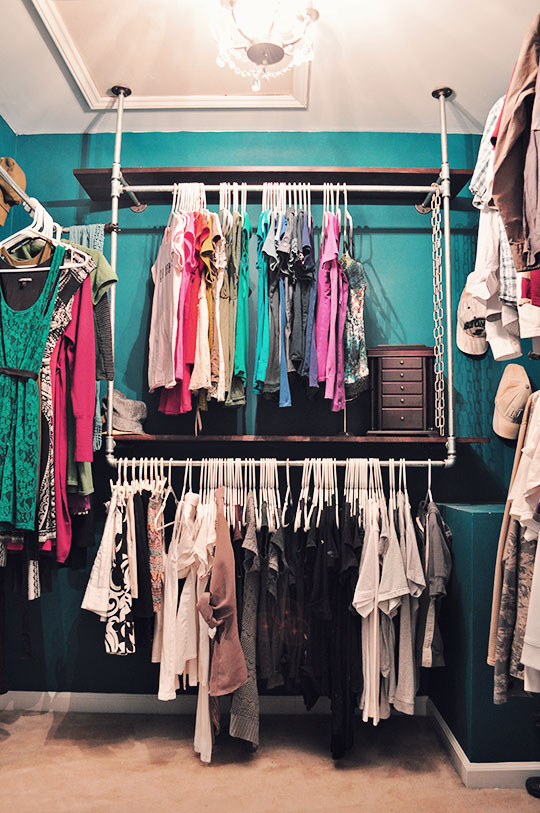
I also ordered this IKEA Kristaller chandelier for only $25 on Ebay.
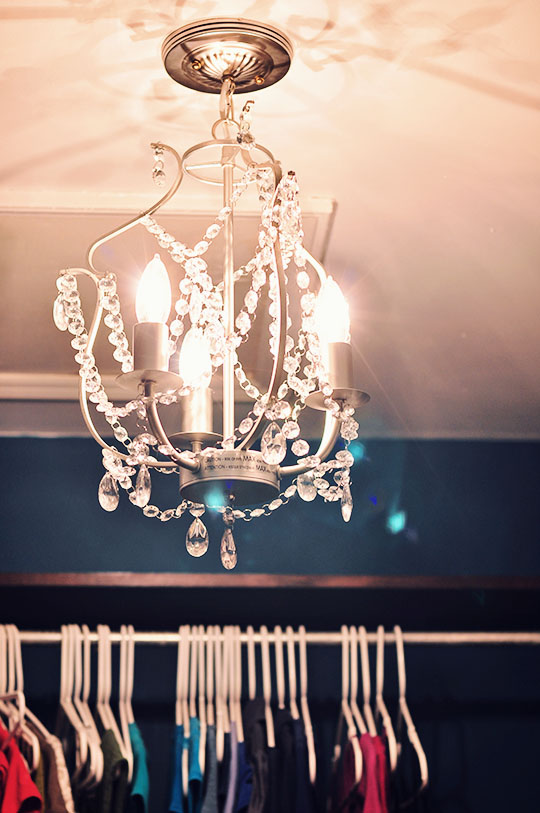
Hey. With all of that manly industrialness going on, I had to have something feminine. When he got home from Afghanistan, Justin was able to Jerry-rig this baby so it hung closer to the ceiling.
This one’s a really pretty option, too!
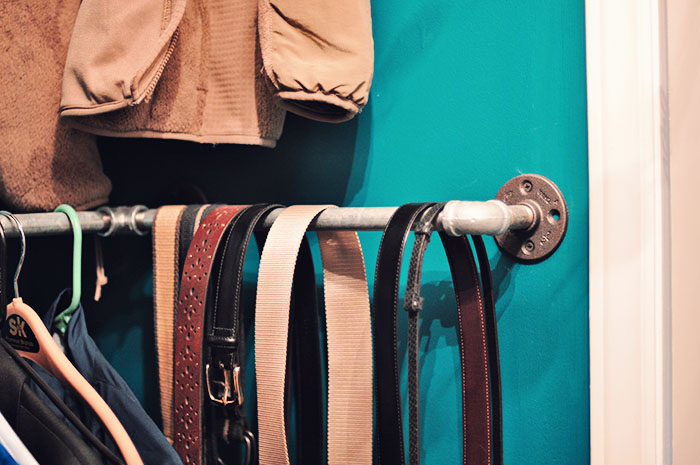
For the dress hanging rod that spans the corner between the back wall unit and the shelving on the left, I ordered two of these 3/4″ x 1/2″ black plastic saddle tees from Home Depot to hold the pipes in place. **UPDATE** These plastic saddle tees gave out on me after several months. Apparently my dresses — and maybe those galvanized steel pipes with the elbow bend — were just a little too hefty to be held up by plastic. I ended up ordering these brass 3/4″ x 1/2″ saddle tees from GP Lawn and they worked much better!
It would’ve been more sturdy to integrate steel “T” fittings into each unit, but the idea of ensuring the whole thing would be level in the end proved too daunting of a task, so I opted for this route. I do have to tighten them with a screwdriver occasionally because the steel pipes are so heavy, but it works perfectly for dresses.
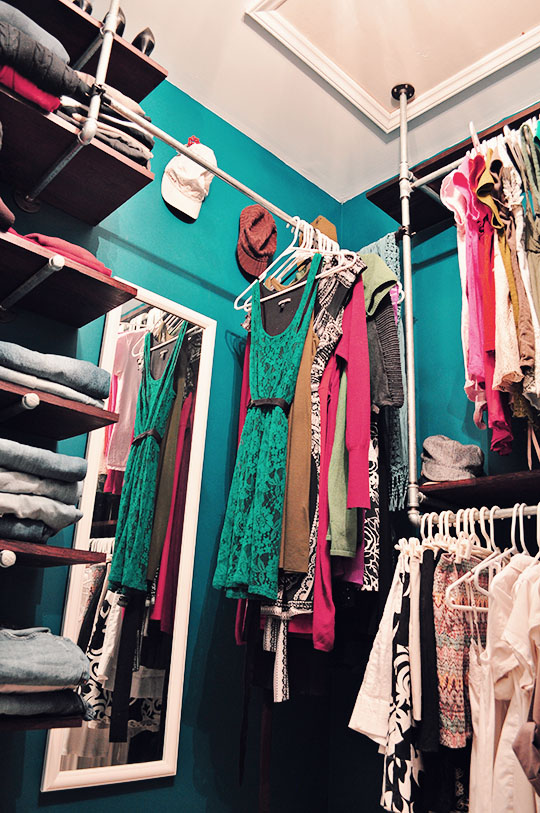
Finally, I hung a mirror.
Every girl needs a mirror.
I could’ve spruced it up to transform this cheapo Target wall mirror we’ve had forever into something more interesting, but c’mon. I was burned out.
Plus it matches the plastic hangars.
And that’s IT!
I added all of our clothes back in (actually, way more clothes than had previously fit), and while I rue how these plastic hangars look in the photos, I’m thrilled with the final product.
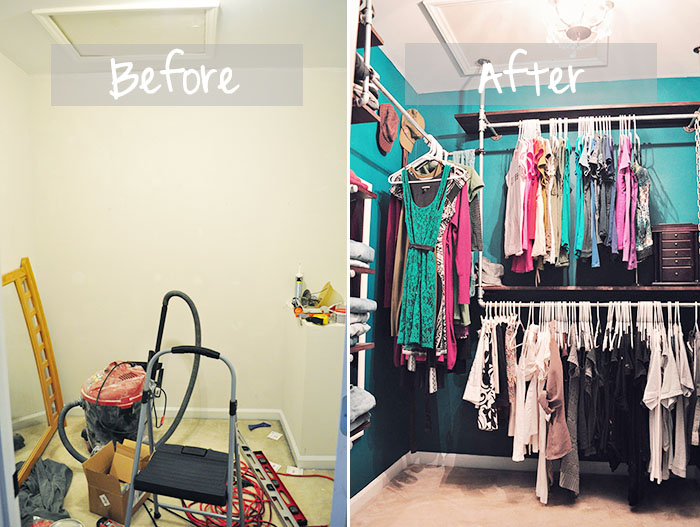
If I were better at staging for photos, it would look much more pristine, but hey. This is how we live. If you decide to tackle this project yourself, I want to give you a realistic expectation of how it will turn out.
And to me, it turned out pretty fantastic.
Excuse the poor lighting — natural light always works better, but the one thing this closet is missing is a window. That said, this is probably the closest representation of the actual wall color and the chandelier is actually very bright in person. Also, it would look ten times better with wood hangars, but hey. Plastic is what I have.
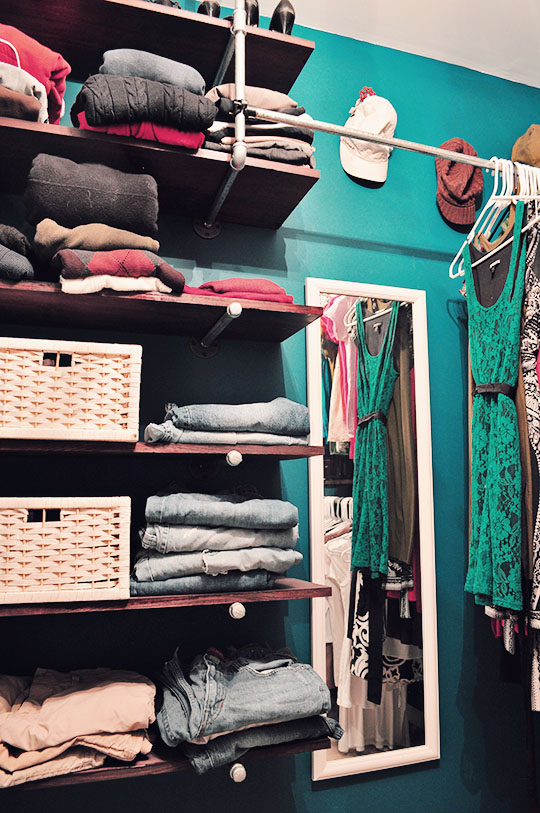
Left wall:
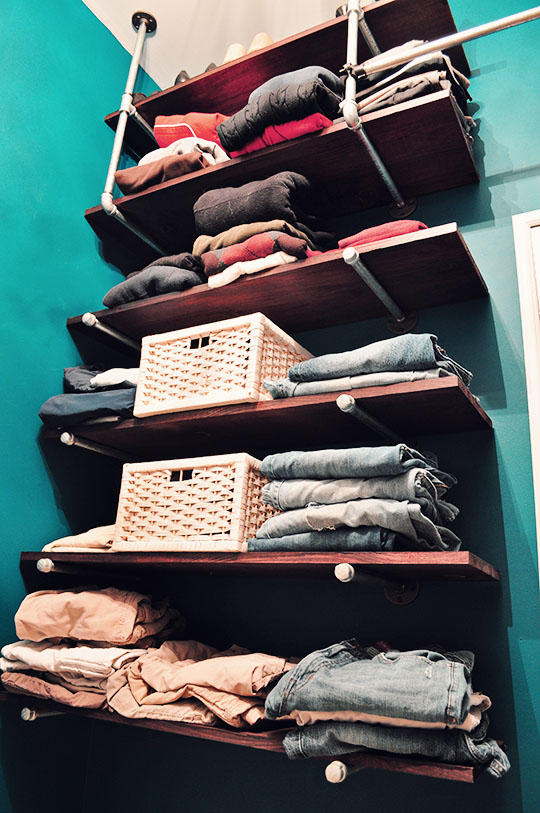
Left back corner:
Back wall:
Back right corner:
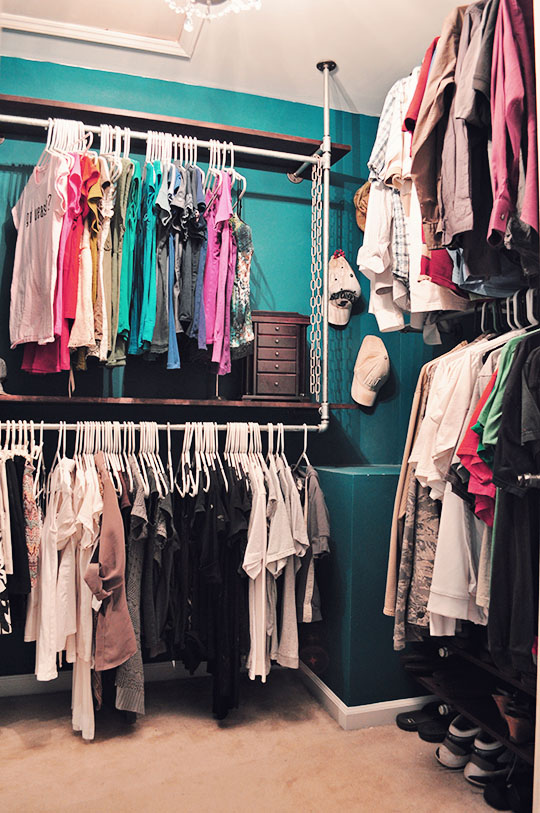
Right wall:

Shoe shelf close-up:
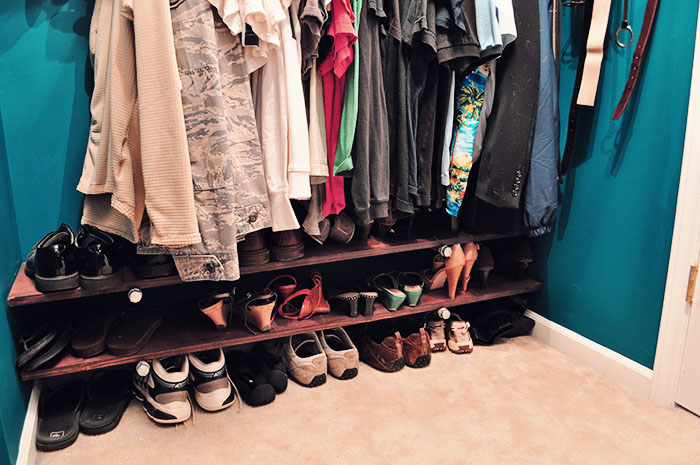
I seriously have more storage in this closet now than I could ever need:

Sometimes I walk into my closet, turn on the lovely girly chandelier, and just stare.
I may not have any babies, but this baby is my greatest DIY accomplishment.
UPDATE: If you want to see a reader’s AMAZING take on an industrial closet, check out her copycat project. It’s gorgeous!!
What do you think? Would you tackle this project yourself?
Comments
[…] RIGHT HERE to see Part 2 and final “after” […]
Sigh. I’m still struggling on the design of mine because the folks at Menards aren’t as awesome as Kelly & Co and won’t cut down/thread my pipes. So I have to work within the confines of the studs and pole sizes. Plus, I’m cheap and plumbing pipe isn’t. The hubs thinks we should just move the fugly white coated metal builder grade crap up higher. He’s wrong, of course, and I may have to break down and spend his money to prove it. Yours looks great. Question is – will you leave it when you move or find a way to take it with you?
Wha?? Do you have a Home Depot? It’s hardly worth the price if you can’t have your pipes cut because buying eight 12″ pre-cut pipes is waaaay more expensive than buying one 8′ pipe and having it cut for you. As you know. I wish I had a “before” shot of ours with that coated metal stuff – your husband would be SOLD.
I’m definitely leaving it here for the next owner. It’s pretty much custom for the space, and it would be way too big of a pain-in-the-ass to move. :)
Yep. I called Lowes & the chick said “we have a threader but not a cutter”. Um, they are pre-threaded. If you can’t cut it why on earth would you need to thread it? This is another reason I can’t stand that store. HD is 10 miles up the road. Unless my measurements were SPOT ON (which I promise they will not be) I will complete this project for a whopping $70. And that does not include any shelving. Meh.
OMG you are SO talented! I looooove it. The chandelier is divine.
Aw, thank you! I’m definitely not very talented – just persistent when it came to this project. :) I’m so glad I went with a girly chandelier!
Yay! made the blog!!
Biggest life goal? ACCOMPLISHED. ;)
Hi Katie,
I don’t think I saw this in the two posts, but do you mind telling me what this project cost? I have a large reach-in closet (jealous of your walk-in) and want to do something similar with shelving up the middle and hanging rods on both sides. P.S. The closet is divine and kudos to you for imagining such an awesome upgrade!
xSteph
Hey there! I didn’t include it because, disorganized and chaotic as I am, I’m pretty sure I’ve lost most of the receipts that I thought I’d kept with the good-intention of providing a cost breakdown. I’m out of town now and will try to look for them when I get home, but if I had to give a ballpark estimate, I’d say maybe hovering around $400 (including closet paint, shelf stain, screws and everything.) I think that might be an overestimate — the pipes were pricey but I saved a ton of money by buying the flanges online and having Home Depot cut long pipes down to size. It sounds like a lot, but I have a pretty big closet and a custom system for the entire thing could’ve cost well into the thousands!
I want to make a simple 10 ft closet rod freestanding kind of like this one http://www.xojane.com/files/sites/default/files/imagecache/article_full_width/field_image_attachments/article/rack4.jpg
Im just wondering if the 1/2 inch galvanized piping at a straight 10 feet long will be strong enough to hold the weight of the clothes I will hang on it without bowing??? Do you feel if you hadn’t cut the pipes down and left them at 10ft, if they would hold up just fine without bowing? I know they’re just clothes not like we are going to be sitting smack in the middle of the 10ft pipe…just wondering your opinion.
Hey, thanks for stopping by! I’m definitely not an expert, but the galvanized steel I used is STRONG. Like, I’m pretty sure I could do pull-ups on it no problem. The key is whether or not whatever is holding it up is secure. For example, my dress hanging rod in my closet is held up by plastic pieces. That’s definitely not as secure as the photo you linked to, which is a steel rod held up by other steel rods and secured with steel fittings. I would be SHOCKED if a steel pipe bent in the center from the weight of just clothes, but definitely ask the employees at your hardware store to be sure. If you’re worried, you could always add one more support pole in the center, just to be safe.
Bravo to you !!!! G o r g e o u s.
Would you share the dimensions of the right wall sections with the pipe hanger for belts? i have a similar wall section but my carpenter is saying we need 20-22 inches for hanging which just seems super large. I am sure we can make that corner into usable space for belts/ties….at the end of a reno and trying to get contractor to use these materials instead of the builders grade crap. :)
Aw, thank you! And no problem – that wall is 28.75″ wide from the corner to the edge of the door frame. I couldn’t use that entire length for belt hanging because I needed enough space for the hangars to hang on that other rod without bumping into the other wall. So I had to figure that out first, before I knew how much space would be left for the belt hanging rod (which could be much closer to the wall, since I wouldn’t be using it to hang hangars). The rods with the clothes are 10″ away from the wall, which worked perfectly for me. That pipe with the belts is only 15″ long, plus a little bit of length where it joins with the “T” fitting on the one side and the elbow fitting on the other side, making the entire available belt hanging length around 16″. You can see that because of the corner, his clothes overlap the belt hook a good 8-9 inches, but we can still hang belts behind the clothes no problem.
Does that make sense?? It’s kind of hard to explain. Don’t hesitate to ask if you have other questions! Good luck with your contractor — some love a good challenge (if you’re willing to pay for it, of course), and others aren’t so thrilled. ;)
Hi Katie,
First, thank you and your husband for serving our country. :D I’m in a similar boat, mine’s navy, so no pun intended…
We’re purchasing our first house and our “master bedroom” has a very small closet. As in, MAYBE, my entire arm would be the depth of the closet. So, I’ve been looking for ideas to make a walk-in/through closet out of space IN the room. We also have an attached bathroom, so the space I’m thinking of using has a door and a window and a “missing” third wall. All that being said, I think this is the most awesome post I’ve ever seen! The prep, steps, pictures, and your efforts to NOT make a sex joke had me in awe, thinking, and laughing out loud.
I think this is how I am going to build my closet, ceiling to floor, with metal pipes and create a third wall out of something to hide the back of the closet. I’ll use the existing closet, open up the entrance to just be open, and put our dressers in it. A place for my husband to put his keys/ change/ etc. as he comes into the room. Maybe put some shelves or rods for his every day clothes.
Thanks again!
Cassie
Cassie,
Thank YOU for serving as well and thank you for stopping by! I know these posts are super long, but I really was trying to include every detail in case someone actually wanted to try to make these themselves. Your project sounds so cool, and I bet this will work great for it! The planning part is the hardest, but once you have that down, the rest comes together pretty easily. Stay motivated, let me know if you have any questions (I’m not an expert but can try my best to help), and please send me some pictures when you’re done! :)
[…] This would look so much more impressive with wooden hangers, but I just can’t stomach spending the money. You can see how I built this industrial chic closet organizer here! […]
This post has made my life. seriously. my eyes have been opened. you are THE sutff. Thank you. Now I’m off to make my room perfect :)
Haha! That’s awesome. I hope you do it! I do need to update this post, though – don’t buy the plastic saddle tees to hold up the bar that’s holding the dresses (if you do one of those). Mine eventually gave out and I had to order brass ones online. (This is where I bought mine: http://www.gplawn.com/p-489-brass-saddle-tees.aspx) Now those puppies aren’t going anywhere!
[…] pipe is black pipe. I degreased and cleaned them [check out my instructions on how to do this] before spray painting with an oil rubbed bronze spray paint. Almost all of my fittings and […]
[…] not put marks in the walls (If you don’t care about holes check these options out here and here . After looking around at rolling racks you could buy they all just seems to flimsy and the space […]
[…] the wall (If you don’t care about holes check these options out here and here . After looking around at rolling racks you could buy they all just seems too flimsy and the […]