
Now THIS Is A Plumbing Pipe Closet Organizer.
YOU GUYS.
I think it’s safe to say that not a whole lot shocks me anymore. I mean, we live in an age when news from around the world is right in our faces, all of the time — at our desks, in our hands, on our phones. Not to mention the non news stuff — from satirical websites to wannabe YouTube stars to this.
(I do really wish I could un-see that.)
But most stuff? I can handle.
When Rihanna showed up in a naked dress to the CFDA Awards, I was like, Wow. Awesome bod.
And when Chris Knox told the Huffington Post that Trader Joe’s infamous wine known as “Two Buck Chuck” is made up of insect parts and animal blood, I was like, Well, you get what you pay for.
But then one of my readers, Christina, emailed me and told me she’d made an industrial chic closet organizer inspired by the one I built out of steel plumbing pipes for our old house, and yeah.
Blown away.
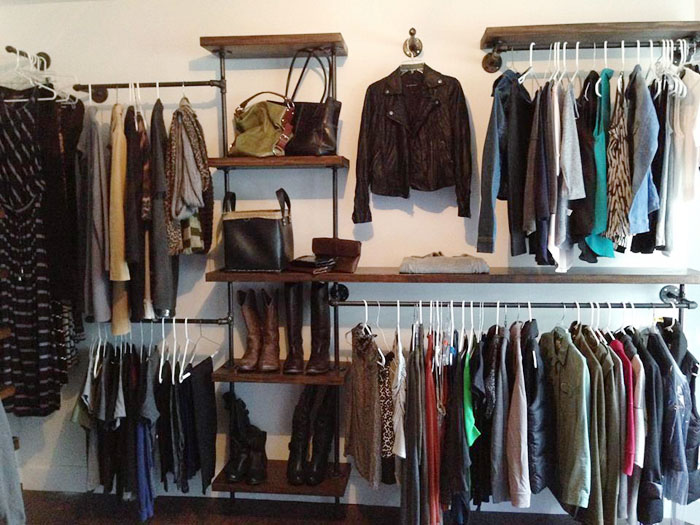
Okay first off? Christina gets an A+ for design. Hers puts my weenie little closet organizer to shame. Second? I’m having major wardrobe envy right now. I’ve been wanting to update my “look,” and I kind of think Christina should shop for me. Or at least consider sending me that jacket.
And those bags.
And every single pair of boots.
Modestly referring to herself as an “Amateur DIYer,” Christina writes (in green):
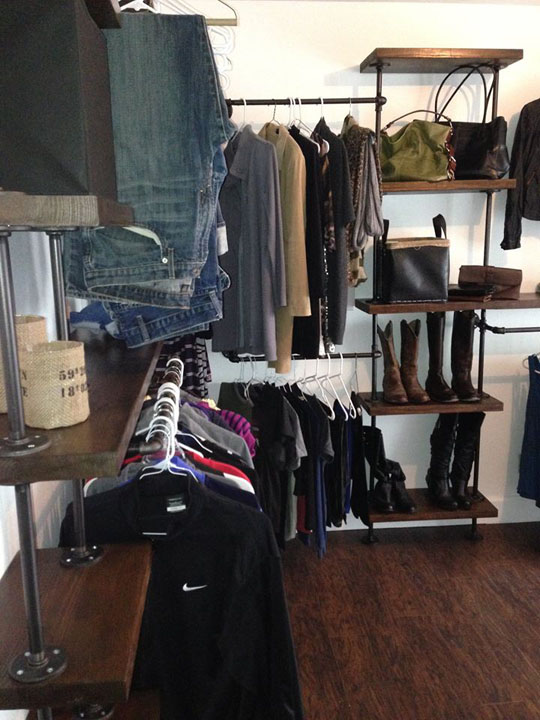
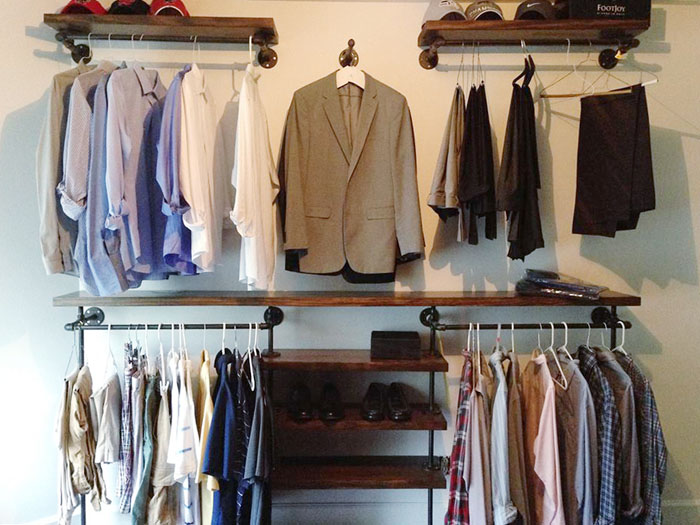
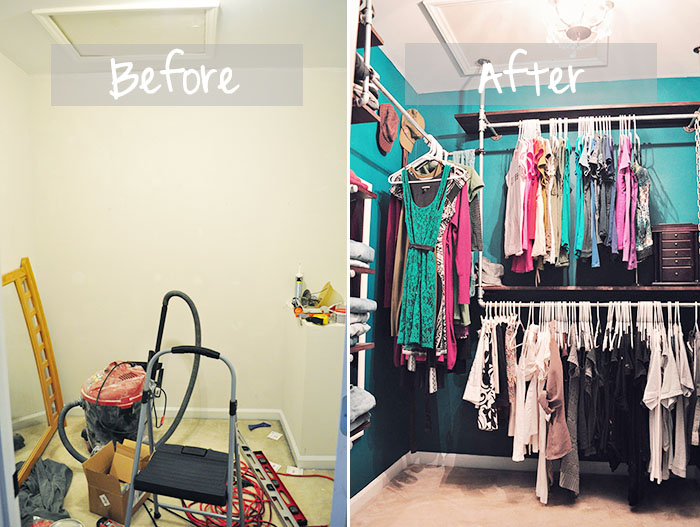
We had this smaller office space right next to our master bedroom that we converted. While I drew up a few designs, everything changed as I went. At first I wanted to drill holes through the shelves like many do, but I was concerned about stability and lining up holes. The uneven floors and walls really ended up dictating the design as well. While I wanted to use all pre-cut pipe, I quickly learned that was not at all going to be possible. To give you an idea, in the picture with my husband’s suits and shirts, the two pipes that are vertical from the floor to the hanging bar are different in height by nearly half an inch.
(Katie’s note: Those top shelves aren’t actually crooked — sometimes wide camera angles can distort straight lines.)
The wood is from Lowes and a local lumber yard. They are pine 2 x 12s. I sanded and stained them, then applied a coat of poly.
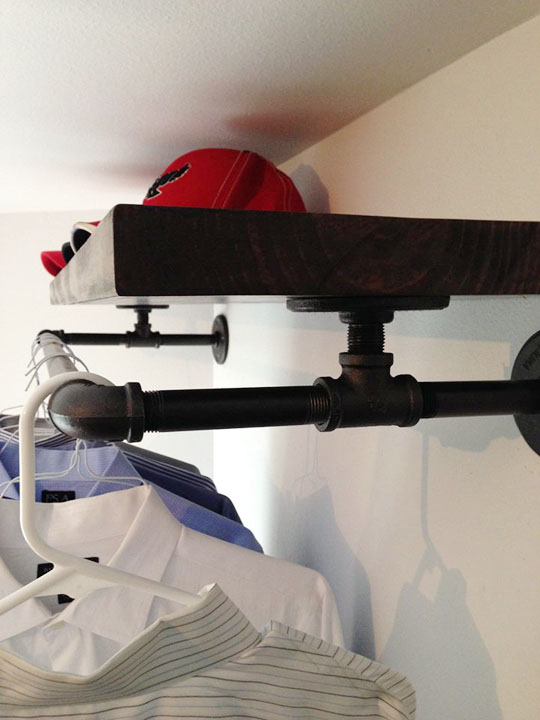
The pipe is black pipe. I degreased and cleaned them [check out my instructions on how to do this] before spray painting with an oil rubbed bronze spray paint. Almost all of my fittings and any pre-cut pipe I ordered online because it saved so much money.
The shelves are screwed into a flange- connected to a nipple- connected to a tee. [Yep, “nipple” is the correct term. This is why plumbing rocks. Check out my description of all of the major fittings for further explanation.] Initially I just wanted to lay the wood directly on top, but then I realized that left no room for hangers to fit over the bar. Extending the bar out an inch or two didn’t match with the design of the shelf and hanging bar below. I’m sure there was an easier way, I just ran with the idea though.
There is an easier (and cheaper) way — the way I did it — but I love how Christina’s looks even better!
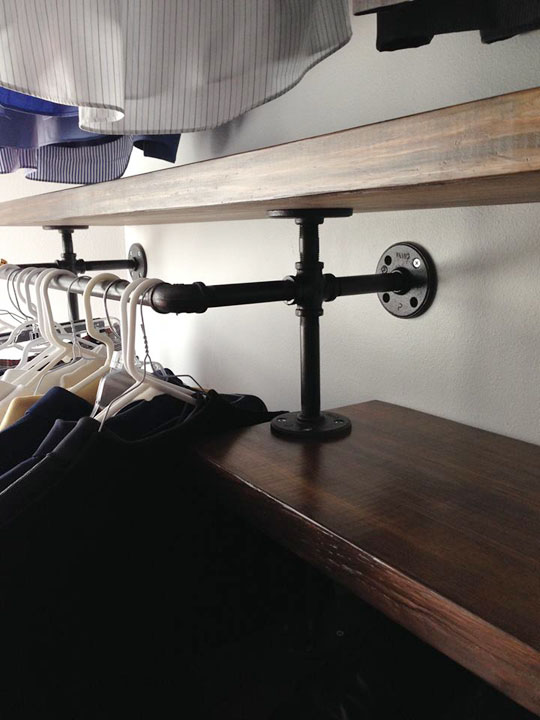
The beautiful thick wood she chose and the color she spray painted her pipes has something to do with it, but the extensive use of flanges (those round things with the screw holes) really gives it a super high-end look.
Because… well… it is super high-end. Flanges ain’t cheap. (Though the ones I bought were significantly less expensive than those from the box stores.)
One thing I would go back and change would be using four flanges instead of two on the shelves. Floor flanges were the most expensive fitting. I wanted to save money by using fewer flanges. It was a challenge to get the two flanges lined up perfectly across from each other AND so that when they were connected to the shelf above, none of the pipes were tilted. I actually remade some because I messed it up so bad in the beginning.
Part of the problem was that the boards varied in width 1/16-1/8. In hindsight, I would have just paid more and installed four flanges — one in each corner. Also, I learned that you definitely get what you pay for when it comes to floor flanges. The expensive, domestic flanges are far superior to the imported flanges. 80% of the imported flanges (from China) were unusable. Most were uneven when laying on a flat surface, which I could work with some. The primary problem was that the interior thread caused the pieces of pipe to tilt slightly. I was fortunate that the company I ordered from would allow me to exchange the flange. It was just that with each new batch, there was a guaranteed amount that wouldn’t work. Since the domestic flanges were so different in appearance and I had already used so many of the imported flanges, I had to stick with the imported ones to keep a consistent look.
I had a few day-drinking days. <– Friend, you are not alone!
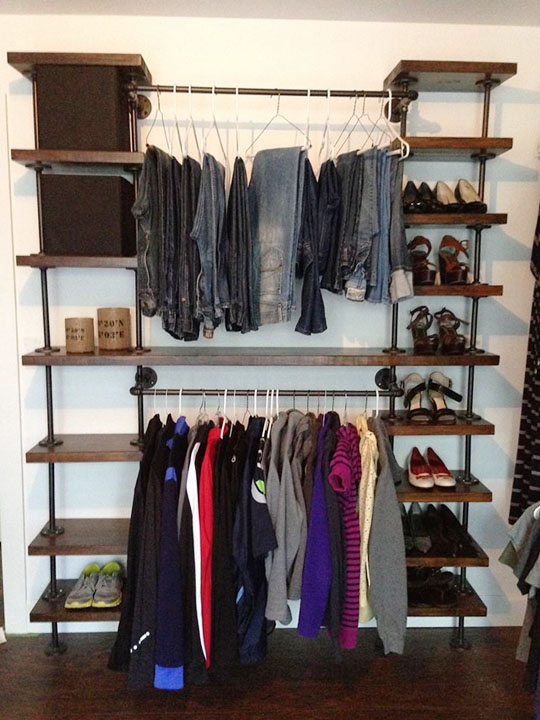
I’m pretty excited about it. Sometimes, I stare at it in disbelief. I’m hoping that whenever the time comes to sell our house that it will add value or help sell our house. We have other features that aren’t as attractive (steep driveway, small kitchen), so I absolutely need to make the most of the other areas.
Umm… I think she succeeded. She’s a little embarrassed about her plastic and wire hangars, but those can get upgraded over time.
When I asked Christina if she’d let people hire her to do this, she said she’d have to charge a lot of money to make it worth the stress and time — enough to take a nice, relaxing vacation. So simple project, this is not. But I have to say — her results definitely shouldn’t hurt her when it comes time for re-sale.
And throughout the process, she managed to stay (mostly) positive.
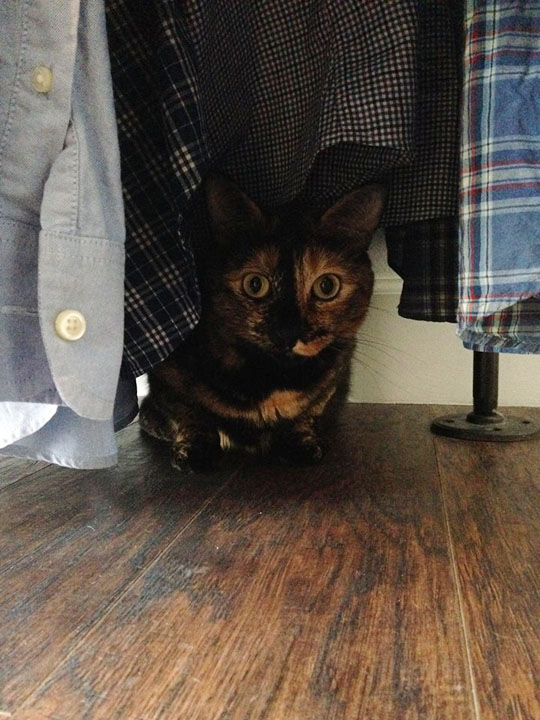
Well, with a lot of perseverance, alcohol and iTunes, I finished! It took 8 months. I did, however, take a few month-long breaks because it got pretty exhausting. The closet is a huge hit with my husband, and surprisingly, my cat. She loves to hang out under the clothes.
VERY nicely, done, Christina! I bet walking into your closet feels like walking into a high-end department store. These photos kind of make me want to crawl into the tiny box of a closet we have in our new house and curl up in a ball and cry.
Or day drink.
That’s always fun, too.
What do you think of Christina’s DIY closet organizer? Are you as blown away as I am??
P.S. Here’s a look at mine (one of my most popular posts!) from back in the day:
Like what you see? Subscribe below so we can connect via email!
Comments
i wanted to do this to one of my spare rooms but given the fact that i’m renting and my track record for moving averages every 1.5 years… sigh. i guess i’ll have to wait till i buy.
Yeah, unfortunately this is not a project I’d recommend for short-term renters. Too much of a time/money investment. But one day, Shelly!! :)
It looks like a store!
Doesn’t it?! All it needs is a cushy chaise lounge right in the middle and I could stay there all day.
[…] tell you what. It’s photos of projects like Christina’s, which I posted on Friday, that have the power to either kick a huge motivational boot to my butt […]
Love it! I am a minimalist and anal about organization, so I think this is awesome, and I want all her boots too!
[…] If you want to see a reader’s AMAZING take on an industrial closet, check out her copycat project. It’s […]
[…] If you want to see a reader’s AMAZING take on an industrial closet, check out her copycat project. It’s […]
Thank you so much for sharing! We have a new closet to do and really love this. We’re hoping to go with the dark spray painted pipe version, but the guy at Home Depot said that he’s heard from other customers that the hangers moving over the pipes begins to flake off on the clothes. Do you know if Christina experienced this? Thanks again… And Happy New Year!
Hi Valerie! Thanks for stopping by. I tried contacting Christina but haven’t heard anything back yet. I could see that being an issue, especially if you use metal hangars. When I built mine, I left my steel pipes unpainted. I know you can also buy black pipes, which might be a better option that trying to paint. Or, if you really really want to paint them, maybe try some kind of clear protective top coat for good measure — you definitely don’t want that paint flaking off on your clothing!
Of course, RIGHT after I responded to you, I heard back from Christina. Here’s what she said: “I have not had any problems with paint flaking. I made sure to clean and degrease the pipes thoroughly before I applied a Rustoleum spray paint. I expected the hangers to scrape at the paint on the hanging rods, but so far the paint has held strong. I designed the hanging rods so that I could take them out and reapply paint if ever that was needed. So far, everything still looks new.”
I hope this helps! :)
Thanks, Katie and Christina! This helps tremendously, and I really appreciate your time and guidance. Great idea also to plan to be able to take sections out if a touch up needs to be done. I’m excited to get the closets put together now, but I’m not going to rush the planning or prepping phase:)
No problem! You should send me pictures via email or on my Facebook page when you get it all done! And definitely take your time with the planning and prepping — that is by far the most difficult part. Once that’s done, the installation is a breeze!
Where did you buy (what website) the pre cut pipes? Thanks.
I wish I could tell you! She didn’t provide that info to me. For my own closet, Home Depot cut the pipes for me at no extra charge — it saved me a LOT of money.
Also looking where you got the precut pipes!
Hi Katie,
I just love the black pipe closet !!! On the closet figuration with all the shoe shelving. Have a Materials list. did you use 1/2 inch pipe or 3/4 pipe. What was the total cost of all the pipes and pipefitting. How far do you have the hanging bar from the wall.
Thank you
Ron Sleister
I know I can make it is wide to suit my needs. I would like to know how wide your shelves are and how wide is closet rod. Thanks again Ron
Hi Ron, What you’re seeing in this post is actually a closet organizer that was built by one of my readers based off of the instructions I gave in a couple of different posts. Hers turned out even better than mine, but if you want to see my original instructions and measurements, then please check out these two very detailed posts:
Part 1
Part 2
Just wanted to thank you for sharing this project. It inpired me to build my dream closet (https://www.dropbox.com/s/a4qvy8sxp5qxnts/2016-10-16%2017.50.45.jpg?dl=0). Just a tip for readers that are thinking about doing this, get the parts you need from Supply.com & Essential Hardware. Much cheaper than anywhere else and they have all the precut pipes you could need. THANKS!
Holy CRAP, Adrian — that looks amazing! Great job and thanks for the supply tips!!
Adrian, whats a great job its beautiful. Exactly the idea of what I was wanting to do for my closet. What size pipes and flanges did you use? 3/4 or 1/2 in
Thanks. I used 3/4″ flanges.
[…] Source: domestiphobia.net […]
I love the closet, and I am in the process of assembling a number of pieces for closets, mudroom and desks. Regarding doing this in a closet, would you recommend painting the pipes, or does the paint get scraped off when you slide hangers? Thanks!
If you can find a paint designed for metals and use a primer, it might work. But you’ll definitely run the risk of it scratching off over time… that’s just the nature of paint!
[…] style we chose was based on look we found at Domestiphobia. We liked the look of the one pipe looking like it was extended from the ground to the 90 degree […]
Hi Katie…absolutely love th closet that Christina has built. Could you please tell me if you or Christina used wall anchors at all or screwed the flanges into the wall studs only. Will the anchors hold the weight of the pipes and the shelf? Thanks!!